 |
ac30zw00004464
QUICK RELEASE CONNECTOR (EMISSION SYSTEM) REMOVAL/INSTALLATION [SKYACTIV-X 2.0]
id0116hf805500
Replacement part
|
Retainer
Quantity: 1
Location of use: Quick release connector (type B)
|
Oil and chemical type
|
Engine oil
Type: Recommended oil
|
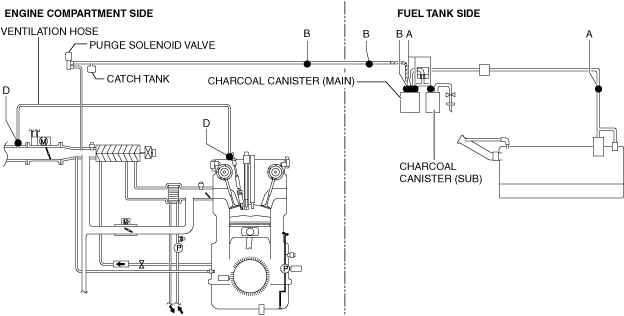
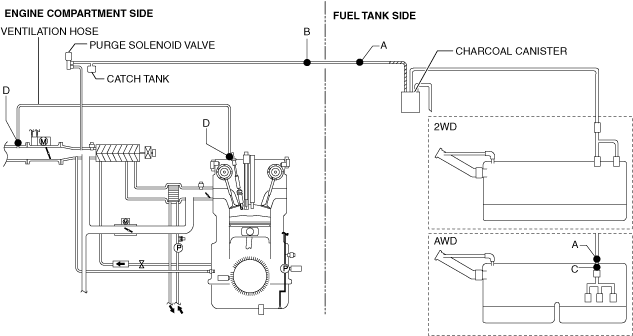
Quick Release Connector Type and Position
Except Chinese specs.
ac30zw00004464
|
Chinese specs.
ac30zw00004465
|
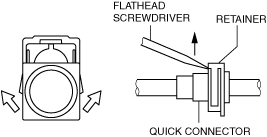
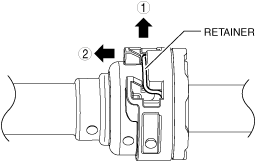
Type A Removal
1. Move the retainer upward using a small flathead screwdriver or equivalent.
am3zzw00035743
|
2. Pull out the quick release connector at a level angle from the opposite side and disconnect it.
3. Protect the disconnected quick release connector and evaporative pipe by wrapping them in plastic to prevent damage or soiling.
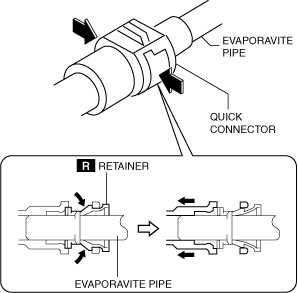
Type B Removal
1. Press the retainer with your fingers while holding the center of the retainer tabs.
am3zzw00035744
|
2. Pull the connector side to disconnect the quick release connector.
3. Protect the disconnected quick release connector and evaporative pipe by wrapping them in plastic to prevent damage or soiling.
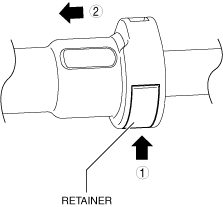
Type C Removal
1. Press the retainer with your fingers.
am3zzw00035745
|
2. Pull the connector side to disconnect the quick release connector.
3. Protect the disconnected quick release connector and evaporative pipe by wrapping them in plastic to prevent damage or soiling.
Type D Removal
1. Move the retainer upward using a small flathead screwdriver or equivalent.
am3zzw00035746
|
2. Pull out the quick release connector at a level angle from the opposite side and disconnect it.
3. Protect the disconnected quick release connector and evaporative pipe by wrapping them in plastic to prevent damage or soiling.
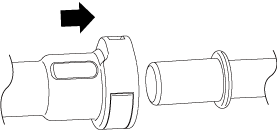
Type A Installation
1. Inspect the evaporative hose and the sealing surface on the opposite side for damage or deformation.
2. Install the quick release connector in the order shown in the figure.
am3zzw00035747
|
3. Press and pull the quick release connector forward/back several times and verify that it is connected securely.
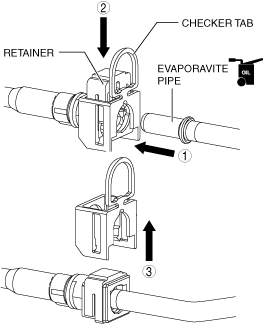
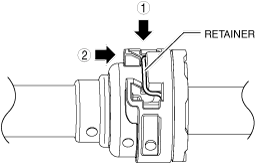
Type B Installation
am3zzw00035748
|
1. Inspect the evaporative hose and the sealing surface of the evaporative pipe for damage or deformation.
2. Apply a small amount of engine oil to the sealing surface of the evaporative pipe.
3. Install a new retainer to the quick release connector.
4. Press the evaporative hose into the evaporative pipe parallel until a click sound is heard and connect.
5. Press and pull the quick release connector forward/back several times and verify that it is connected securely.
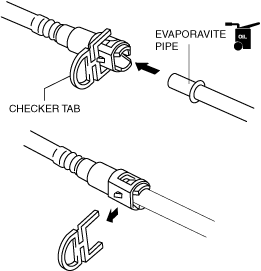
Type C Installation
1. Inspect the evaporative hose and the sealing surface of the evaporative pipe for damage or deformation.
aaxjjw00027887
|
2. Apply a small amount of engine oil to the sealing surface of the evaporative pipe.
3. Press the evaporative hose into the evaporative pipe parallel until a click sound is heard and connect.
4. Press and pull the quick release connector forward/back several times and verify that it is connected securely.
Type D Installation
1. Inspect the evaporative hose and the sealing surface on the opposite side for damage or deformation.
2. Install the quick release connector in the order shown in the figure.
am3zzw00035749
|
3. Press the retainer down with your fingers.
4. Press the evaporative hose into the opposite pipe parallel until a click sound is heard and connect.
5. Press and pull the quick release connector forward/back several times and verify that it is connected securely.