49 D015 001
Box wrench

ENGINE COOLANT TEMPERATURE (ECT) SENSOR REMOVAL/INSTALLATION [SKYACTIV-G (WITHOUT CYLINDER DEACTIVATION (E))]
id0140u1801900
Special Service Tool (SST)
|
49 D015 001
Box wrench
|
|
Replacement Part
|
O-ring
Quantity: 1
Location of use: ECT sensor No.1
|
O-ring
Quantity: 1
Location of use:ECT sensor No.2
|
Washer
Quantity: 1
Location of use:ECT sensor No.2
|
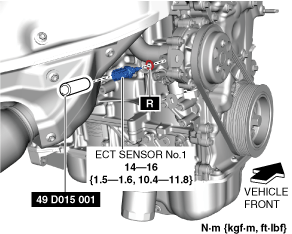
ECT sensor No.1
1. Disconnect the negative battery terminal. (See NEGATIVE BATTERY TERMINAL DISCONNECTION/CONNECTION [(E)].)
2. Drain the engine coolant. (See ENGINE COOLANT REPLACEMENT [SKYACTIV-G (WITHOUT CYLINDER DEACTIVATION (E))].)
3. Lift up the vehicle.
4. Remove the front under cover No.2. (See FRONT UNDER COVER No.2 REMOVAL/INSTALLATION.)
5. Disconnect the ECT sensor connector.
6. Remove the ECT sensor No.1 using the SST.
ac30zw00005235
|
7. Install in the reverse order of removal.
8. Refill the engine coolant. (See ENGINE COOLANT REPLACEMENT [SKYACTIV-G (WITHOUT CYLINDER DEACTIVATION (E))].)
ECT sensor No.2
1. Disconnect the negative battery terminal. (See NEGATIVE BATTERY TERMINAL DISCONNECTION/CONNECTION [(E)].)
2. Drain the engine coolant. (See ENGINE COOLANT REPLACEMENT [SKYACTIV-G (WITHOUT CYLINDER DEACTIVATION (E))].)
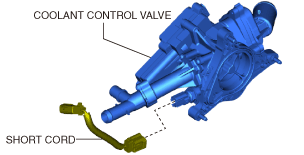
3. Remove the coolant control valve. (See COOLANT CONTROL VALVE REMOVAL/INSTALLATION [SKYACTIV-G (WITHOUT CYLINDER DEACTIVATION (E))].)
4. Remove the short cord.
am3zzw00024351
|
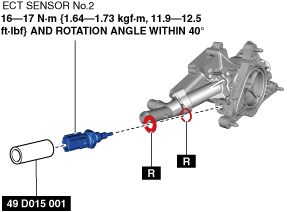
5. Remove the ECT sensor No.2 using the SST.
am3zzw00036868
|
6. Install in the reverse order of removal.
7. Refill the engine coolant. (See ENGINE COOLANT REPLACEMENT [SKYACTIV-G (WITHOUT CYLINDER DEACTIVATION (E))].)
ECT Sensor No.2 Installation Note
1. Tighten ECT sensor No.2 until the engine coolant control valve is seated.
2. Tighten ECT sensor No.2 to the specified torque of 16—17.5 N·m and within the rotation angle of 40°.