 |
am3zzw00035080
ELECTRIC VARIABLE VALVE TIMING MOTOR/DRIVER INSPECTION [SKYACTIV-X 2.0]
id0110hf828100
|
Item |
Reference |
|---|---|
|
Intake electric variable valve timing motor/driver
|
|
|
Exhaust electric variable valve timing motor/driver
|
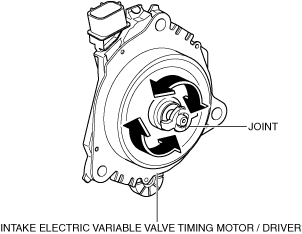
Intake Electric Variable Valve Timing Motor/Driver
Intake electric variable valve timing driver control inspection
1. Perform the KOER self-test. If the following DTCs are detected, repair the applicable malfunctioning location according to the applicable DTC troubleshooting. (See DTC INSPECTION.)
2. Access the PCM PIDs [VLV_TIMING_ACT_IN] and [VLV_TIMING_DSD_IN] using the M-MDS data monitor function.
3. Drive the vehicle (accelerate/decelerate and drive at constant speed), and verify that the PID [VLV_TIMING_ACT_IN] value changes in conjunction with the PID [VLV_TIMING_DSD_IN] value.
Intake electric variable valve timing motor unit inspection
1. Disconnect the negative battery terminal. (See NEGATIVE BATTERY TERMINAL DISCONNECTION/CONNECTION [(E)].)
2. Remove the intake electric variable valve timing motor/driver. (See ELECTRIC VARIABLE VALVE TIMING MOTOR/DRIVER REMOVAL/INSTALLATION [SKYACTIV-X 2.0].)
3. Rotate the intake electric variable valve timing motor joint to the left and right by your fingers and verify that it rotates smoothly in 15° increments.
am3zzw00035080
|
4. Install in the reverse order of removal.
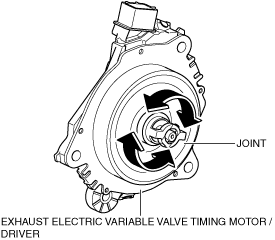
Exhaust Electric Variable Valve Timing Motor/Driver
Exhaust electric variable valve timing driver control inspection
1. Perform the KOER self-test. If the following DTCs are detected, repair the applicable malfunctioning location according to the applicable DTC troubleshooting. (See DTC INSPECTION.)
2. Access the PCM PIDs [VLV_TIMING_ACT_EX] and [VLV_TIMING_DSD_EX] using the M-MDS data monitor function.
3. Drive the vehicle (accelerate/decelerate and drive at constant speed), and verify that the PID [VLV_TIMING_ACT_EX] value changes in conjunction with the PID [VLV_TIMING_DSD_EX] value.
Exhaust electric variable valve timing motor unit inspection
1. Disconnect the negative battery terminal. (See NEGATIVE BATTERY TERMINAL DISCONNECTION/CONNECTION [(E)].)
2. Remove the exhaust electric variable valve timing motor/driver. (See ELECTRIC VARIABLE VALVE TIMING MOTOR/DRIVER REMOVAL/INSTALLATION [SKYACTIV-X 2.0].)
3. Rotate the exhaust electric variable valve timing motor joint to the left and right by your fingers and verify that it rotates smoothly in 15° increments.
am3zzw00035081
|
4. Install in the reverse order of removal.