|
am3zzw00034764
OIL CONTROL VALVE (OCV) FOR CYLINDER DEACTIVATION INSPECTION [SKYACTIV-G (WITH CYLINDER DEACTIVATION (E))]
id0110u3809900
OCV for No.1 Cylinder Deactivation
Coil resistance inspection
1. Disconnect the negative battery terminal. (See NEGATIVE BATTERY TERMINAL DISCONNECTION/CONNECTION [(E)].)
2. Disconnect the OCV for No.1 cylinder deactivation connector. (See OIL CONTROL VALVE (OCV) FOR CYLINDER DEACTIVATION REMOVAL/INSTALLATION [SKYACTIV-G (WITH CYLINDER DEACTIVATION (E))].)
3. Measure the resistance between terminals A and B using an ohmmeter.
am3zzw00034764
|
4. Install in the reverse order of removal.
Operation inspection
1. Remove the OCV for No.1 cylinder deactivation. (See OIL CONTROL VALVE (OCV) FOR CYLINDER DEACTIVATION REMOVAL/INSTALLATION [SKYACTIV-G (WITH CYLINDER DEACTIVATION (E))].)
2. Verify that the battery voltage is between 12 and 16 V. (See BATTERY INSPECTION [(E)].)
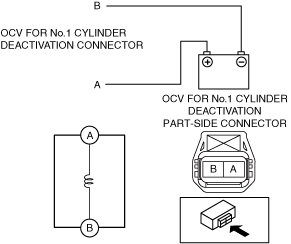
3. Connect the battery to the OCV for No.1 cylinder deactivation connector (2 terminals) as shown in the figure.
am3zzw00034765
|
4. Verify that there is an operation sound from the OCV for No.1 cylinder deactivation when applying battery voltage between OCV for No.1 cylinder deactivation connector terminals A and B.
5. Install the OCV for No.1 cylinder deactivation. (See OIL CONTROL VALVE (OCV) FOR CYLINDER DEACTIVATION REMOVAL/INSTALLATION [SKYACTIV-G (WITH CYLINDER DEACTIVATION (E))].)
OCV for No.4 Cylinder Deactivation
Coil resistance inspection
1. Disconnect the negative battery terminal. (See NEGATIVE BATTERY TERMINAL DISCONNECTION/CONNECTION [(E)].)
2. Disconnect the OCV for No.4 cylinder deactivation connector. (See OIL CONTROL VALVE (OCV) FOR CYLINDER DEACTIVATION REMOVAL/INSTALLATION [SKYACTIV-G (WITH CYLINDER DEACTIVATION (E))].)
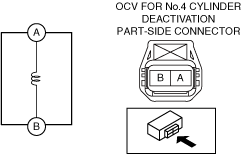
3. Measure the resistance between terminals A and B using an ohmmeter.
am3zzw00034766
|
4. Install in the reverse order of removal.
Operation inspection
1. Remove the OCV for No.4 cylinder deactivation. (See OIL CONTROL VALVE (OCV) FOR CYLINDER DEACTIVATION REMOVAL/INSTALLATION [SKYACTIV-G (WITH CYLINDER DEACTIVATION (E))].)
2. Verify that the battery voltage is between 12 and 16 V. (See BATTERY INSPECTION [(E)].)
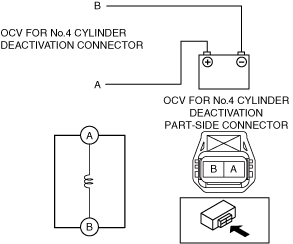
3. Connect the battery to the OCV for No.4 cylinder deactivation connector (2 terminals) as shown in the figure.
am3zzw00034767
|
4. Verify that there is an operation sound from the OCV for No.4 cylinder deactivation when applying battery voltage between OCV for No.4 cylinder deactivation connector terminals A and B.
5. Install the OCV for No.4 cylinder deactivation. (See OIL CONTROL VALVE (OCV) FOR CYLINDER DEACTIVATION REMOVAL/INSTALLATION [SKYACTIV-G (WITH CYLINDER DEACTIVATION (E))].)