 |
am3zzw00030440
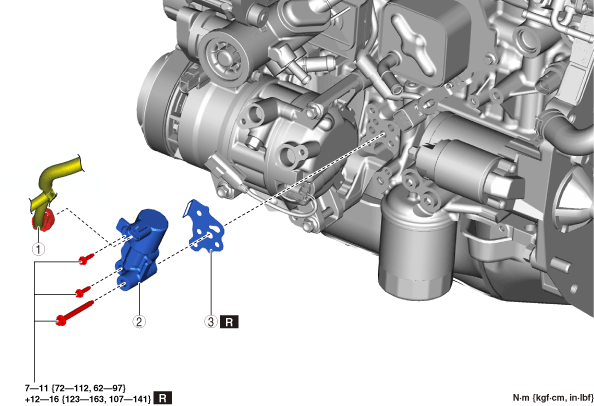
ENGINE OIL SOLENOID VALVE REMOVAL/INSTALLATION [SKYACTIV-D 1.8]
id0111t1003000
Replacement Part
|
Bolt
Quantity: 3
Location of use: Engine oil solenoid valve
|
Gasket
Quantity: 1
Location of use: Engine oil solenoid valve
|
Oil and Chemical Type
|
Engine oil
Type: Recommended oil
|
1. Disconnect the negative battery cable. (See NEGATIVE BATTERY TERMINAL DISCONNECTION/CONNECTION [(E)].)
2. Remove the engine cover. (See ENGINE COVER REMOVAL/INSTALLATION [SKYACTIV-D 1.8].)
3. Remove the front under cover No.1 and No.2. (See FRONT UNDER COVER No.1 REMOVAL/INSTALLATION.) (See FRONT UNDER COVER No.2 REMOVAL/INSTALLATION.)
4. Drain the water-cooled charge air cooler coolant. (See WATER-COOLED CHARGE AIR COOLER COOLANT REPLACEMENT [SKYACTIV-D 1.8].)
5. Remove the electric water pump. (See ELECTRIC WATER PUMP REMOVAL/INSTALLATION [SKYACTIV-D 1.8].)
6. Remove in the order indicated in the table.
7. Install in the reverse order of removal.
8. Refill the water-cooled charge air cooler coolant. (See WATER-COOLED CHARGE AIR COOLER COOLANT REPLACEMENT [SKYACTIV-D 1.8].)
9. Inspect the water-cooled charge air cooler coolant leakage. (See WATER-COOLED CHARGE AIR COOLER COOLANT REPLACEMENT [SKYACTIV-D 1.8].)
10. Start the engine and confirm that there is no oil leakage.
am3zzw00030440
|
|
1
|
Engine oil solenoid valve connector
|
|
2
|
Engine oil solenoid valve
|
|
3
|
Gasket
|
Engine Oil Solenoid Valve Removal Note
1. Cover the area around the engine oil solenoid valve with a rag because a small amount of engine oil will leak from the engine oil solenoid valve installation area.
Engine Oil Solenoid Valve Installation Note
1. Tighten the three new bolts in two steps.