• Highly pressurized fuel may spray out if the fuel line is cut. Due to the following dangers occurring with a fuel spray, always complete the “Fuel Line Safety Procedure” to prevent the fuel from spraying.
― Fuel may cause irritation if it comes in contact with skin and eyes.
― If fuel ignites and causes a fire, it may lead to serious injury or death, and damage to property and facilities.
• A person charged with static electricity could cause a fire or explosion, resulting in death or serious injury. Before performing work on the fuel system, discharge static electricity by touching the vehicle body.
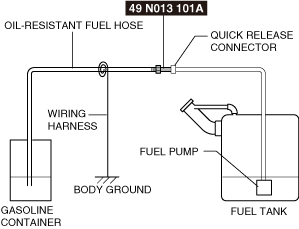
• Connect a ground wire to the oil-resistant fuel hose for draining fuel and the vehicle because the oil-resistant fuel hose for draining fuel may become electrically charged.
Fuel Siphoning Procedure Using Fuel Pump
Caution
• Disconnecting/connecting the quick release connector without cleaning it may possibly cause damage to the fuel pipe and quick release connector. Always clean the quick release connector joint area before disconnecting/connecting using cloth or soft brush, and make sure that it is free of foreign material.
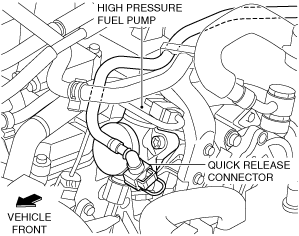
4. Connect the oil-resistant fuel hose connected to the SST to the disconnected quick release connector and collect the fuel into the gasoline container.
am3zzw00036913
5. Connect the wiring harness between the oil-resistant fuel hose and the vehicle body using the following procedure.
(1) Strip off 10 cm {3.9 in} or more of the insulation from both ends of the wiring harness.
(2) Wrap the wiring harness on one side around the oil-resistant fuel hose.
(3) Connect the wiring harness on the other side to body ground securely.
6. Drain the fuel from the fuel tank using the following procedure:
Caution
• The fuel pump could be damaged if it is operated while there is no fuel in the fuel tank. Verify the amount of fuel being discharged from the hose and stop operation of the fuel pump when essentially no fuel is being discharged.
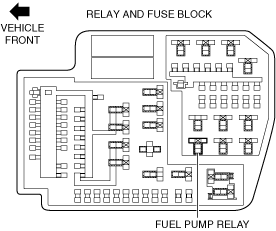
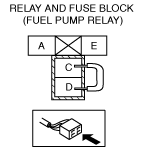
(1) Remove the fuel pump relay.
am3zzw00021291
Caution
• Short the specified terminals because shorting the wrong terminal of the relay and fuse block may cause malfunctions.
(2) Using a jumper wire, short fuel pump relay terminals C and D in the relay and fuse block.
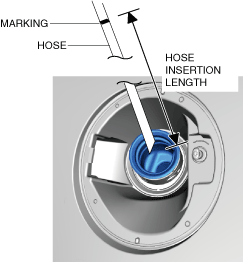
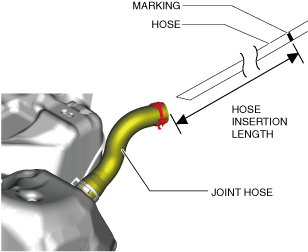
• If an excessive length of hose is inserted into the joint hose, the hose will push the non-return valve and the hose may enter the fuel tank. If the hose enters the fuel tank, the hose may get stuck on the non-return valve when the hose is pulled out and the non-return valve could be damaged. Do not insert the hose more than the specified length.
Note
• When removing the hose from the joint hose (fuel-filler pipe side), use a cloth to prevent fuel spatter.
• Cut the tip of the hose diagonally so that it can be inserted into the joint hose smoothly.
• When inserting the hose into the joint, the hose may get stuck. In such cases, rotate the hose so that the hose can be inserted easily.
• The pump siphons all the fuel that leaked out of the non-return valve and was trapped in the joint hose, then it suctions the air. After siphoning the fuel, wait several seconds until the air is suctioned out, then resume siphoning.
1. Disconnect the joint hose from the fuel-filler pipe.
2. Siphon the fuel in the joint hose.
(1) Cut the tip of the hose diagonally and place a mark at the position of the specified hose insertion length.
am3zzw00024804
Hose insertion length (specified value)
220 mm {8.66 in}
Hose type (reference)
Oil-resistant plastic hose of 10 mm {0.39 in} outer diam. ×6 mm {0.2 in} inner diam. or equivalent
(2) Insert the hose from the joint hose (fuel-filler pipe side) by rotating it to the marked position.
(3) Siphon the fuel until the fuel in the joint hose is completely siphoned out.
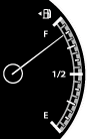
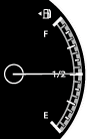
3. Perform the following procedure if the fuel gauge value before siphoning the fuel is 8/16 or more. If the fuel gauge value is less than 8/16, go to the next step.
(1) Insert the hose into the fuel tank (main).
(2) Direct the inserted hose into the fuel tank (sub).