Home

Mazdamanuals.com

CHARCOAL CANISTER INSPECTION [SKYACTIV-X 2.0]

CHARCOAL CANISTER INSPECTION [SKYACTIV-X 2.0]


 id0116hf800500


Leakage Inspection

Caution
•  Do not apply a pressure 20 kPa {150 mmHg, 5.91 inHg} or more to the charcoal canister for 1 min. or more. Doing so will damage the charcoal canister.

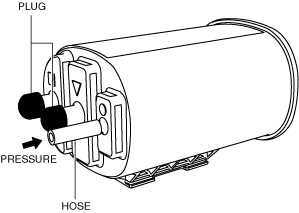
1.  Remove the charcoal canister. (See CHARCOAL CANISTER REMOVAL/INSTALLATION [SKYACTIV-X 2.0].)

2.  Assemble the hose used for inspection to port A.

am3zzw00035726

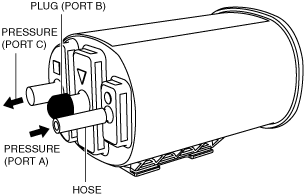
3.  Cover ports B and C with the caps.

4.  Apply pressure (19.6 kPa {147 mmHg, 5.79 inHg}) through the hose, and verify that air does not leak from the charcoal canister.

am3zzw00035727

•  If there is airflow, replace the charcoal canister. (See CHARCOAL CANISTER REMOVAL/INSTALLATION [SKYACTIV-X 2.0].)
•  If there is no airflow, perform the following "Airflow Inspection". (See Airflow Inspection)


Airflow Inspection

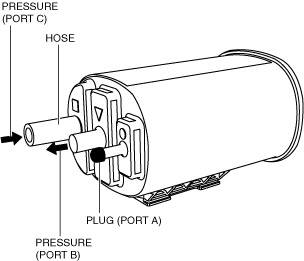
1.  Perform the following procedure to verify the charcoal canister airflow. (Between port A and port C)

(1)  Plug the port B.
am3zzw00035728
(2)  Apply a pressure of 0.98 kPa {7.4 mmHg, 0.29 inHg} to port A.
(3)  Verify that there is airflow from port C.
•  If there is no airflow, replace the charcoal canister. (See CHARCOAL CANISTER REMOVAL/INSTALLATION [SKYACTIV-X 2.0].)

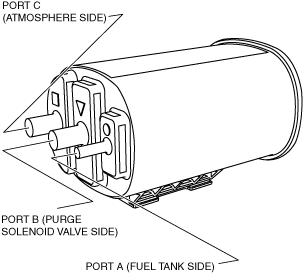
2.  Perform the following procedure to verify the charcoal canister airflow. (Between port B and port C)

(1)  Plug the port A.
am3zzw00035729
(2)  Apply a pressure of 0.98 kPa {7.4 mmHg, 0.29 inHg} to port C.
(3)  Verify that there is airflow from port B.
•  If there is no airflow, replace the charcoal canister. (See CHARCOAL CANISTER REMOVAL/INSTALLATION [SKYACTIV-X 2.0].)