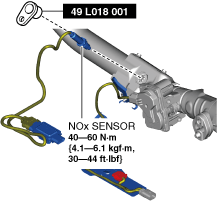
1: 49 L018 001
2: –
O2 sensor wrench

NOx SENSOR REMOVAL/INSTALLATION [SKYACTIV-X 2.0]
id0140hf824900
Special service tool (SST)
|
1: 49 L018 001
2: –
O2 sensor wrench
|
|
Replacement part
|
Band
Quantity: 5
Location of use: NOx sensor
|
Clips
Quantity: 1
Location of use: NOx sensor
|
1. Disconnect the negative battery terminal. (See NEGATIVE BATTERY TERMINAL DISCONNECTION/CONNECTION [(E)].)
2. Remove the tunnel cover. (See MIDDLE PIPE REMOVAL/INSTALLATION [SKYACTIV-X 2.0].)
3. Remove floor under cover No.1. (See FLOOR UNDER COVER REMOVAL/INSTALLATION.)
4. Remove the bolt shown in the figure.
am3zzw00035011
|
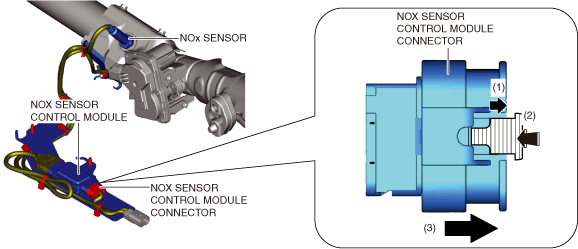
5. Disconnect the NOx sensor control module connector.
am30jw00000577
|
6. Remove the NOx sensor control module connector from the bracket. (See NOx Sensor Control Module Removal Note.)
7. Cut the bands shown in the figure. (See Band Installation Note.)
am3zzw00035013
|
8. Remove the NOx sensor using the SST. (See NOx Sensor Control Module Installation Note.)
am3zzw00035014
|
9. Install in the reverse order of removal.
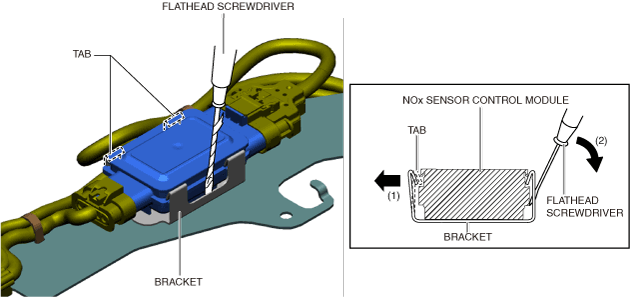
NOx Sensor Control Module Removal Note
1. Verify that the bracket tabs are securely engaged with the groove of the NOx sensor control module as shown in the figure.
am3zzw00036862
|
2. While moving the tab of the bracket in the direction of arrow (1), move the flathead screwdriver in the direction of arrow (2) and detach the bracket tabs from the NOx sensor control module.
3. Remove the NOx sensor control module.
NOx Sensor Control Module Installation Note
1. Verify that the bracket tabs are securely engaged with the groove of the NOx sensor control module as shown in the figure.
am3zzw00035893
|
Band Installation Note
1. Install bands as shown in the figure.
am3zzw00035894
|