Home

Mazdamanuals.com

REAR BRAKE HOSE REMOVAL/INSTALLATION [(E)]

REAR BRAKE HOSE REMOVAL/INSTALLATION [(E)]


 id041100001499

Replacement Part

Gasket
 
Quantity: 2
 
Location of use: Rear brake hose

Oil and Chemical Type

Brake fluid type [Without Mazda M Hybrid]
 
Type: SAE J1703 or FMVSS116 DOT-3 or DOT-4
Brake fluid type [With Mazda M Hybrid]
 
Type: Mazda Genuine Brake Fluid or equivalent

Caution
•  Brake fluid will damage painted surfaces. Be careful not to spill any on painted surfaces. In addition, if there is any brake fluid on the wiring harness, the wire insulation may corrode causing a malfunction such as a short circuit. If brake fluid gets on a painted surface or wiring harness, wash and flush it off completely with water immediately.
•  Do not empty the brake fluid in the rear brake caliper. Otherwise, the DSC HU/CM or electronically controlled brake unit could be damaged.
•  When disconnecting the brake hose from the rear brake caliper, always plug and seal the rear brake caliper so that brake fluid does not leak.
•  A new rear brake caliper has been plugged sealing off the brake fluid. For this reason, remove the plug of the rear brake caliper directly before installing the rear brake caliper to the vehicle. Other than for this, do not remove the plug of the rear brake caliper.
Note
•  Tighten the brake pipe flare nut using any commercially available flare nut wrench.

1.  Remove the wheel and tire. (See WHEEL AND TIRE REMOVAL/INSTALLATION.)

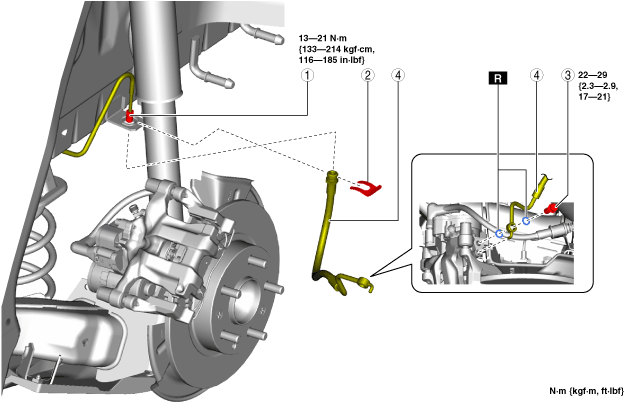
2.  Remove in the order indicated in the table.

3.  Install in the reverse order of removal.

4.  After installation, add brake fluid, bleed the air, and inspect for fluid leakage. (See BRAKE FLUID AIR BLEEDING [(E)].)

ac30zw00000969

1
Brake pipe
2
Clip
3
Bolt
4
Brake hose


Brake Hose Removal Note

Caution
•  When disconnecting the brake hose from the rear brake caliper, always plug and seal the rear brake caliper so that brake fluid does not leak.

1.  After disconnecting the brake hose, plug the brake hose installation hole.


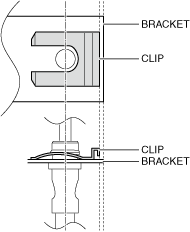
Clip Installation Note

1.  Install a clip to the position shown in the figure.

ac5uuw00007462