FUEL HOSE (FUEL TANK SIDE, TRANSFER HOSE PART) REMOVAL/INSTALLATION [L3 4WD]
FUEL HOSE (FUEL TANK SIDE, TRANSFER HOSE PART) REMOVAL/INSTALLATION [L3 4WD]
id0114b10345b3
-
Warning
-
• Repairing a fuel tank that has not been properly steam cleaned can be dangerous. Explosion or fire may cause death or serious injury. Always properly steam clean a fuel tank before repairing it.
-
• Fuel line spills and leakage are dangerous. Fuel can ignite and cause serious injuries or death and damage. Fuel can also irritate skin and eyes. To prevent this, do not damage the sealing surface of the fuel pump unit when removing or installing.
-
Caution
-
• Disconnecting/connecting the quick release connector without cleaning it may possibly cause damage to the fuel pipe and quick release connector. Always clean the quick release connector joint area before disconnecting/connecting using a cloth or soft brush, and make sure that it is free of foreign material.
Removal
1. Complete the "BEFORE REPAIR PROCEDURE". (See BEFORE REPAIR PROCEDURE [L8, LF, L3].)
2. Disconnect the negative battery cable.
-
Note
-
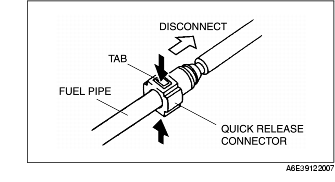
• Squeezing the tab while lightly pushing the fuel hose on the fuel pipe side will make removal easier.
3. Squeeze the tabs on the quick release connector and disconnect the quick release connector from the fuel pipe by pulling it straight back.
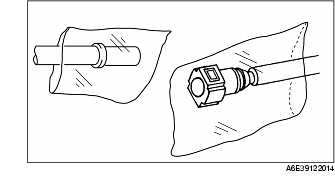
4. Cover the disconnected quick release connector and fuel pipe with vinyl sheets or the like to prevent them from being scratched or contaminated with foreign material.
Installation
-
Caution
-
• If the quick release connector O-ring is damaged, replace the plastic fuel hose. A fuel leak may be caused.
1. Inspect the fuel hose and fuel pipe sealing surface for damage and deformation, and replace as necessary.
2. Slightly apply clean engine oil to the sealing surface of the fuel pump unit.
3. Align the fuel pipe and quick release connector. Push the quick release connector straight into the fuel pipe until a click is heard.
4. Lightly pull and push the quick release connector a few times by hand and verify that it can move 2.0-3.0 mm {0.08-0.11 in} and it is connected securely.
-
• If the quick release connector does not move at all, verify that O-ring is not damaged and slipped, and reconnect the quick release connector.
5. Complete the "AFTER REPAIR PROCEDURE". (See AFTER REPAIR PROCEDURE [L8, LF, L3].)