1. : Mazda SST number
2. : Global SST number
1: 49 B011 105
2: –
Adapter

1: 49 UN20 5072
2: 205-072
Holder
1: 49 G028 205
2: –
Oil seal installer

FRONT OIL SEAL REPLACEMENT [SKYACTIV-D 1.8]
id0110t1800800
Special Service Tool (SST)
|
1. : Mazda SST number
2. : Global SST number
|
|||||
|
1: 49 B011 105
2: –
Adapter
|
|
1: 49 UN20 5072
2: 205-072
Holder
|
|
1: 49 G028 205
2: –
Oil seal installer
|
|
Replacement Part
|
Front oil seal
Quantity: 1
Location of use: Engine front cover
|
Oil and Chemical Type
|
Engine oil
Type: Recommended oil
|
1. Remove the front under cover No.2. (See FRONT UNDER COVER No.2 REMOVAL/INSTALLATION.)
2. Remove the front splash shield. (RH) (See SPLASH SHIELD REMOVAL/INSTALLATION.)
3. Remove the drive belt. (See DRIVE BELT REMOVAL/INSTALLATION [SKYACTIV-D 1.8].)
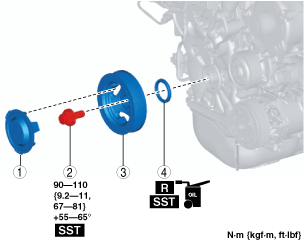
4. Remove in the order indicated in the table.
5. Install in the reverse order of removal.
am3zzw00028913
|
|
1
|
Crankshaft pulley cover
|
|
2
|
Crankshaft pulley lock bolt
|
|
3
|
Crankshaft pulley
|
|
4
|
Front oil seal
(See Front Oil Seal Removal Note.)
|
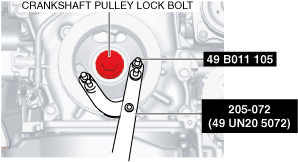
Crankshaft Pulley Lock Bolt Removal Note
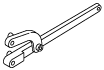
1. Hold the crankshaft pulley using the SSTs.
am3zzw00028914
|
2. Remove the crankshaft pulley lock bolt.
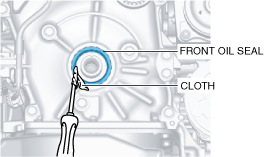
Front Oil Seal Removal Note
1. Cut the front oil seal lip using a utility knife.
2. Remove the front oil seal using a flathead screwdriver with the tip protected by a clean cloth to prevent damage to the crankshaft.
am3zzw00028915
|
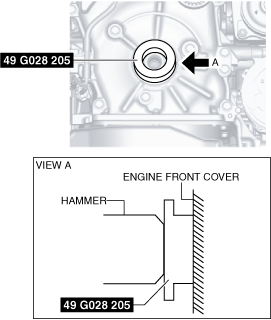
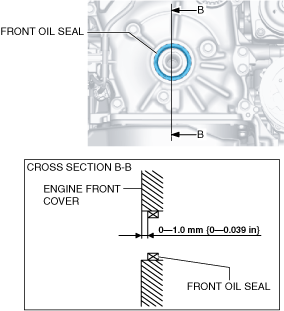
Front Oil Seal Installation Note
1. Apply clean engine oil to the inner surface of a new front oil seal.
2. Insert the front oil seal into the engine front cover by hand.
3. Tap the front oil seal in evenly using the SST and a hammer.
am3zzw00028916
|
am3zzw00028917
|
Crankshaft Pulley Lock Bolt Installation Note
1. Hold the crankshaft pulley using the SSTs.
am3zzw00028914
|
2. Tighten the crankshaft pulley lock bolt in the order shown in the following two steps.
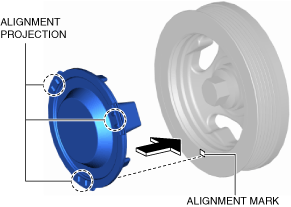
Crankshaft Pulley Cover Installation Note
1. Align the crankshaft pulley alignment mark between the two projections on one of the three crankshaft pulley cover alignment projections.
am3zzw00028918
|
2. Press in the crankshaft pulley cover and attach the tabs of the pulley cover to the pulley groove.
am3zzw00028919
|