 |
am3zzw00035687
FUEL-FILLER PIPE REMOVAL/INSTALLATION [SKYACTIV-X 2.0]
id0114hf806900
1. Level the vehicle.
2. Complete the "BEFORE SERVICE PRECAUTION". (See BEFORE SERVICE PRECAUTION [SKYACTIV-X 2.0].)
3. Drain the fuel. (See FUEL DRAINING PROCEDURE [SKYACTIV-X 2.0].)
4. Open the fuel-filler lid.
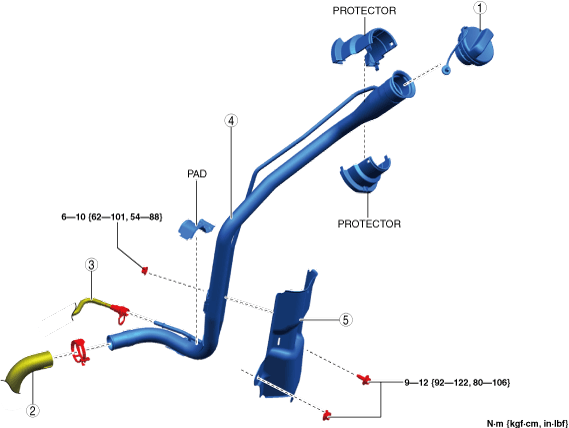
5. Remove in the order indicated in the table.
6. Install in the reverse order of removal.
7. Complete the "AFTER SERVICE PRECAUTION". (See AFTER SERVICE PRECAUTION [SKYACTIV-X 2.0].)
Except Chinese specs.
am3zzw00035687
|
|
1
|
Fuel-filler cap
|
|
2
|
Joint hose
(See Joint Hose Removal Note.)
(See Joint Hose Installation Note.)
|
|
3
|
Breather hose
|
|
4
|
Fuel-filler pipe
|
|
5
|
Fuel-filler pipe protector
|
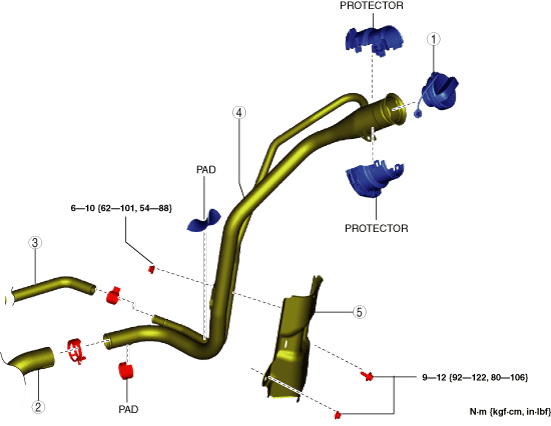
Chinese specs.
am3zzw00030333
|
|
1
|
Fuel-filler cap
|
|
2
|
Joint hose
(See Joint Hose Removal Note.)
(See Joint Hose Removal Note.)
|
|
3
|
Quick release connector
|
|
4
|
Fuel-filler pipe
|
|
5
|
Fuel-filler pipe protector
|
Joint Hose Removal Note
1. Remove the Floor under cover No.2 (LH). (See FLOOR UNDER COVER REMOVAL/INSTALLATION.)
Fuel-filler Pipe Removal Note
1. Remove the rear tire (LH). (See WHEEL AND TIRE REMOVAL/INSTALLATION.)
2. Remove the rear mudguard (LH). (See MUDGUARD REMOVAL/INSTALLATION.)
3. Remove the fuel-filler pipe.
Fuel-filler Pipe Installation Note
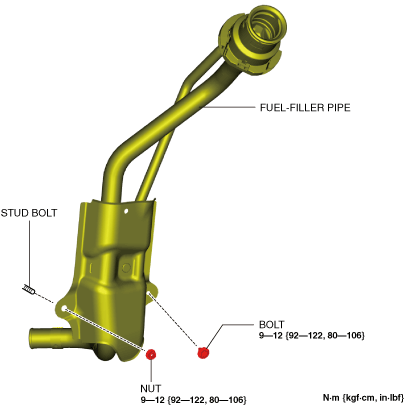
1. Temporarily install the fuel-filler pipe to the vehicle-side stud bolt.
am3zzw00035688
|
2. Temporarily tighten bolt.
3. Completely tighten the nut.
4. Completely tighten bolt.
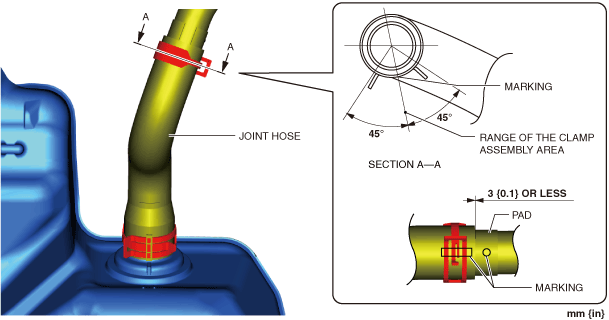
Joint Hose Installation Note
1. Install the joint hose as shown in the figure.
am3zzw00035689
|
Breather Hose Installation Note
1. Install the breather hose as shown in the figure.
am3zzw00035690
|