 |
ac3wzw00004783
LP-EGR CONTROL VALVE REMOVAL/INSTALLATION [SKYACTIV-D 1.8]
id0116q9702900
Replacement Part
|
Gasket
Quantity: 1
Location of use: LP-EGR flange
|
Gasket
Quantity: 1
Location of use: LP-EGR control valve
|
LP-EGR Control Valve Replacement Procedure
1. If the LP-EGR control valve is replaced, perform the following procedure.
|
STEP |
ACTION |
PAGE/CONDITION |
|---|---|---|
|
1
|
Start the engine.
|
—
|
|
2
|
Warm the engine until the engine coolant temperature is 70 degrees C.
|
—
|
|
3
|
Depress the accelerator pedal and race the engine (hold at 2000 rpm for 5 s).
|
—
|
|
4
|
Release the accelerator pedal and idle the engine.
|
—
|
|
5
|
Switch the ignition off.
|
—
|
|
6
|
Wait for 30 s or more.
|
—
|
|
7
|
Perform KOEO self-test procedure.
|
(See DTC INSPECTION.)
|
|
8
|
Perform KOER self-test procedure.
|
(See DTC INSPECTION.)
|
LP-EGR Control Valve Removal /Installation
2WD
1. Disconnect the negative battery terminal. (See NEGATIVE BATTERY TERMINAL DISCONNECTION/CONNECTION [(E)].)
2. Remove the front under cover No.2. (See FRONT UNDER COVER No.2 REMOVAL/INSTALLATION.)
3. Drain the engine coolant. (See ENGINE COOLANT REPLACEMENT [SKYACTIV-D 1.8].)
4. Remove the tunnel cover. (See EXHAUST SYSTEM REMOVAL/INSTALLATION [SKYACTIV-D 1.8].)
5. Disconnect the EGR temperature sensor connector. (European (L.H.D. U.K.) specs.) (See EGR TEMPERATURE SENSOR REMOVAL/INSTALLATION [SKYACTIV-D 1.8].)
6. Disconnect the exhaust gas temperature sensor No.4 connector. (European (L.H.D. U.K.) specs.) (See EXHAUST GAS TEMPERATURE SENSOR REMOVAL/INSTALLATION [SKYACTIV-D 1.8].)
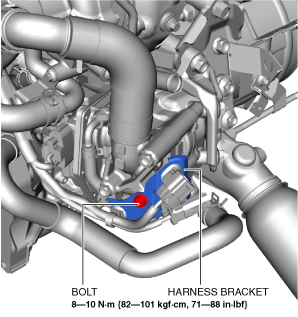
7. Set the wiring harness bracket shown in the figure aside so that it does not interfere with the servicing.
ac3wzw00004783
|
8. Remove in the order shown in the figure.
9. Install in the reverse order of removal.
ac30zw00003715
|
|
1
|
LP-EGR flange component
|
|
2
|
Water hose
(See Water hose installation note.)
|
|
3
|
LP-EGR control valve connector
|
|
4
|
LP-EGR control valve
|
|
5
|
Insulator
|
|
6
|
LP-EGR pipe
(See LP-EGR pipe removal note.)
|
|
7
|
LP-EGR hose
|
|
8
|
EGR temperature sensor (European (L.H.D. U.K.) specs.)
|
|
9
|
LP-EGR flange
|
AWD
1. Disconnect the negative battery terminal. (See NEGATIVE BATTERY TERMINAL DISCONNECTION/CONNECTION [(E)].)
2. Remove the battery and battery tray. (See BATTERY REMOVAL/INSTALLATION [SKYACTIV-D 1.8].)
3. Remove the front under cover No.2. (See FRONT UNDER COVER No.2 REMOVAL/INSTALLATION.)
4. Drain the engine coolant. (See ENGINE COOLANT REPLACEMENT [SKYACTIV-D 1.8].)
5. Remove the tunnel cover. (See EXHAUST SYSTEM REMOVAL/INSTALLATION [SKYACTIV-D 1.8].)
6. Disconnect the EGR temperature sensor connector. (European (L.H.D. U.K.) specs.) (See EGR TEMPERATURE SENSOR REMOVAL/INSTALLATION [SKYACTIV-D 1.8].)
7. Disconnect the exhaust gas temperature sensor No.4 connector. (European (L.H.D. U.K.) specs.) (See EXHAUST GAS TEMPERATURE SENSOR REMOVAL/INSTALLATION [SKYACTIV-D 1.8].)
8. Set the wiring harness bracket shown in the figure aside so that it does not interfere with the servicing. (European (L.H.D. U.K.) specs.)
ac3wzw00004783
|
9. Remove in the order shown in the figure.
10. Install in the reverse order of removal.
ac30zw00003715
|
|
1
|
LP-EGR flange component
|
|
2
|
Water hose
(See Water hose installation note.)
|
|
3
|
LP-EGR control valve connector
|
|
4
|
LP-EGR control valve
|
|
5
|
Insulator
|
|
6
|
LP-EGR pipe
(See LP-EGR pipe removal note.)
(See Water hose installation note.)
|
|
7
|
LP-EGR hose
|
|
8
|
EGR temperature sensor (European (L.H.D. U.K.) specs.)
|
|
9
|
LP-EGR flange
|
LP-EGR pipe removal note
1. Remove the following parts as a single unit:
2. Remove the LP-EGR pipe.
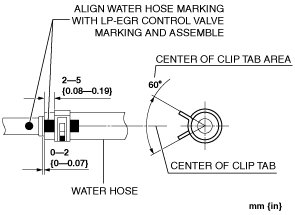
Water hose installation note
1. Install water hose as shown in the figure.
ac3wzw00001738
|
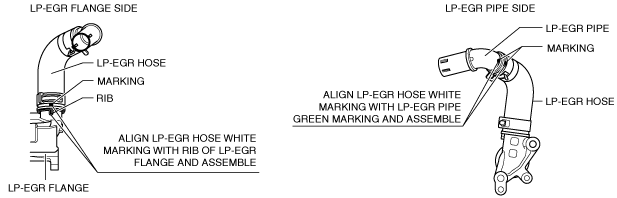
LP-EGR hose installation note
1. Install LP-EGR hose as shown in the figure.
am2zzw00012178
|
LP-EGR pipe installation note
1. install the following parts as a single unit: