49 L018 001
O2 sensor wrench

AIR FUEL RATIO (A/F) SENSOR REMOVAL/INSTALLATION [SKYACTIV-D 1.8]
id0140s1899700
Special Service Tool (SST)
|
49 L018 001
O2 sensor wrench
|
|
ac3wzw00000416
|
Operation After Replacing A/F Sensor
1. If the A/F sensor is replaced, perform the following procedure.
|
Step |
Action |
Page |
|---|---|---|
|
1
|
Perform the A/F sensor data reset procedure.
|
|
|
2
|
Switch the ignition off.
|
—
|
|
3
|
Wait for 30 s.
|
—
|
|
4
|
Switch the ignition ON (engine off).
|
—
|
|
5
|
Perform the KOEO self test procedure.
|
(See DTC INSPECTION.)
|
|
6
|
Start the engine.
|
—
|
|
7
|
Verify that the check engine light does not illuminate.
|
—
|
|
8
|
Perform the KOER self test procedure.
|
(See DTC INSPECTION.)
|
|
9
|
Perform the compulsory diesel particulate filter regeneration procedure.
|
|
|
10
|
Perform the following procedure.
1. Vehicle is traveling at a speed of 50 km/h {31 mph} or more.
2. Release the accelerator pedal at a vehicle speed of 50 km/h {31 mph} or more and maintain this condition for 6 s.
|
—
|
|
11
|
Verify that the PID “O2S11_CAL” value is other than 0.
|
(See DTC INSPECTION.)
|
A/F Sensor Removal/Installation
1. Disconnect the negative battery terminal. (See NEGATIVE BATTERY TERMINAL DISCONNECTION/CONNECTION [(E)].)
2. Remove the engine cover. (See ENGINE COVER REMOVAL/INSTALLATION [SKYACTIV-D 1.8].)
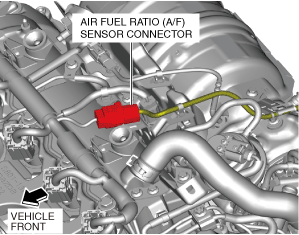
3. Disconnect the A/F sensor connector.
ac3wzw00004837
|
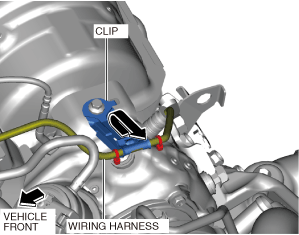
4. Disconnect the wiring harness clip.
ac3wzw00005095
|
5. Remove the wiring harness from the clip. (See Wiring harness installation note.)
ac3wzw00004839
|
6. Remove the turbocharger insulator. (See TURBOCHARGER WITH VARIABLE TURBINE GEOMETRY REMOVAL/INSTALLATION [SKYACTIV-D 1.8].)
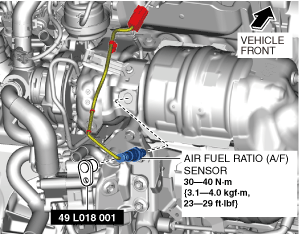
7. Remove the A/F sensor using the SST.
ac3wzw00004840
|
8. Install in the reverse order of removal.
9. Perform the Operation After Replacing A/F Sensor procedure. (See Operation After Replacing A/F Sensor.)
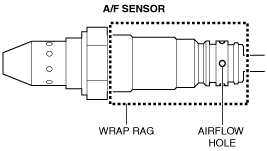
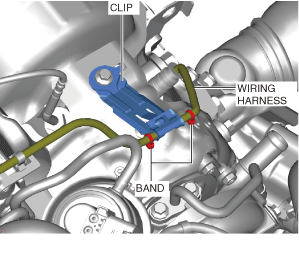
Wiring harness installation note
1. Install the wiring harness as shown in the figure.
ac3wzw00004841
|