 |
am3zzw00022472
VACUUM PUMP REMOVAL/INSTALLATION [SKYACTIV-G (WITHOUT CYLINDER DEACTIVATION (E))]
id041100803663
Replacement Part
|
O-ring
Quantity: 1
Location of use: Vacuum pump
|
1. Disconnect the negative battery terminal. (See NEGATIVE BATTERY TERMINAL DISCONNECTION/CONNECTION [(E)].)
2. Remove the following parts as a single unit. (See INTAKE-AIR SYSTEM REMOVAL/INSTALLATION [SKYACTIV-G (WITHOUT CYLINDER DEACTIVATION (E))].)
3. Remove the battery. (See BATTERY REMOVAL/INSTALLATION [SKYACTIV-G (WITHOUT CYLINDER DEACTIVATION (E))].)
4. Remove the battery tray and PCM component. (See BATTERY REMOVAL/INSTALLATION [SKYACTIV-G (WITHOUT CYLINDER DEACTIVATION (E))].)
5. Set the PCM wiring harness out of the way.
6. Remove the plug hole plate. (See PLUG HOLE PLATE REMOVAL/INSTALLATION [SKYACTIV-G (WITHOUT CYLINDER DEACTIVATION (E))].)
7. Pinch open the clamp using pliers and disconnect the vacuum hose from the vacuum pump. (See VACUUM HOSE REMOVAL/INSTALLATION [SKYACTIV-G (WITHOUT CYLINDER DEACTIVATION (E))].)
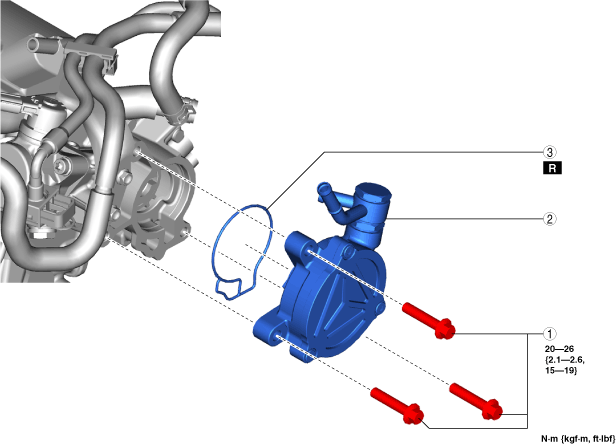
8. Remove in the order shown in the table.
9. Install in the reverse order of removal.
am3zzw00022472
|
|
1
|
Bolt
|
|
2
|
Vacuum pump
(See Vacuum Pump Removal Note.)
|
|
3
|
O-ring
|
Vacuum Pump Removal Note
1. When removing the vacuum pump, place a clean cloth under the installation surface of the vacuum pump so that engine oil does not get on other parts.
2. Remove the vacuum pump.
Vacuum Pump and O-ring Installation Note
1. Rotate the vacuum pump by hand to drain the remainder of the engine oil in the vacuum pump.
2. Degrease the O-ring installation groove and installation surface.
3. Install the O-ring to the vacuum pump.
4. Install the vacuum pump.