 |
am3zzw00012649
ELECTRIC AT OIL PUMP REMOVAL/INSTALLATION [ET6A-EL, ET6AX-EL]
id0517n3117600
Replacement Part
|
O-ring
Quantity: 2
Location of use: Electric AT oil pump
|
Oil and Chemical Type
|
sealant
Type: TB1217E or equivalent
|
1. Turn the steering wheel left until it locks.
2. Disconnect the negative battery terminal. (See NEGATIVE BATTERY TERMINAL DISCONNECTION/CONNECTION [(E)].)
3. Remove the front under cover No.2. (See FRONT UNDER COVER No.2 REMOVAL/INSTALLATION.)
4. Remove the front splash shield (LH). (See SPLASH SHIELD REMOVAL/INSTALLATION.)
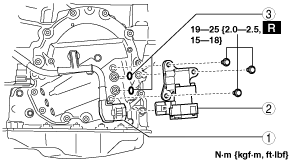
5. Remove in the order indicated in the table.
am3zzw00012649
|
|
1
|
Electric AT oil pump connector
|
|
2
|
Electric AT oil pump
|
|
3
|
O-ring
|
6. Install in the reverse order of removal.
7. Add the ATF. (See AUTOMATIC TRANSAXLE FLUID (ATF) REPLACEMENT [ET6A-EL, ET6AX-EL (E)].)
8. Bleed air using the following procedure.
9. Adjust the ATF level. (See AUTOMATIC TRANSAXLE FLUID (ATF) ADJUSTMENT [ET6A-EL, ET6AX-EL (E)].)
Electric AT Oil Pump Installation Note
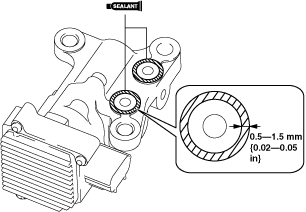
1. Apply a light coat of silicon sealant (TB1217E or equivalent) to the contact surfaces of the electric AT oil pump and end cover.
am6zzw00017737
|
2. Install the electric AT oil pump before the applied sealant starts to harden.