Home

Mazdamanuals.com

LIFTGATE LIGHT REMOVAL/INSTALLATION

LIFTGATE LIGHT REMOVAL/INSTALLATION


id091800812600

Note
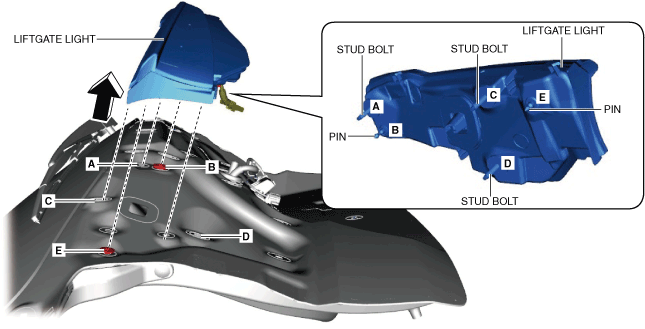
•  Fogging or dew condensation may occur on the inside of the liftgate light because of a natural phenomenon occurring as a result of a temperature difference between the interior and exterior of the liftgate light. However, it has no effect on the light performance because the phenomenon is resolved when temperature inside the liftgate light rises after the back-up light turns on or a period of time has elapsed.

1.  Disconnect the negative battery terminal. (See NEGATIVE BATTERY TERMINAL DISCONNECTION/CONNECTION [(E)].)

2.  Remove the following parts:

(1)  Liftgate upper trim (See LIFTGATE UPPER TRIM REMOVAL/INSTALLATION.)
(2)  Liftgate side trim (See LIFTGATE SIDE TRIM REMOVAL/INSTALLATION.)
(3)  Liftgate recess (See LIFTGATE RECESS REMOVAL/INSTALLATION.)
(4)  Door lock switch (liftgate) (with door lock switch (liftgate)) (See DOOR LOCK SWITCH REMOVAL/INSTALLATION [(E)].)
(5)  Liftgate lower trim (See LIFTGATE LOWER TRIM REMOVAL/INSTALLATION.)
(6)  Side spoiler (See SIDE SPOILER REMOVAL/INSTALLATION.)
(7)  Liftgate garnish (See LIFTGATE GARNISH REMOVAL/INSTALLATION.)
(8)  Rear finisher (See REAR FINISHER REMOVAL/INSTALLATION.)

3.  Disconnect the connector.

ac30zw00002320

4.  Remove the nuts.

5.  Remove the liftgate light in the direction of the arrow shown in the figure.

ac30zw00002321

6.  Remove the grommets.

ac30zw00002323

7.  Install in the reverse order of removal.