|
ac30zw00003134
BATTERY REMOVAL/INSTALLATION [SKYACTIV-X 2.0]
id0117008005hf
1. Remove using the procedure shown in the figure.
2. Install in the reverse order of removal.
Step 1
ac30zw00003134
|
|
1
|
Negative battery cable
|
|
2
|
Positive battery cable
|
|
3
|
Battery clamp
|
|
4
|
Battery box
|
|
5
|
Battery
(See Battery Removal Note.)
|
|
6
|
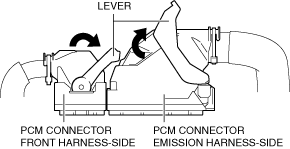
PCM connector
|
|
7
|
Battery tray, PCM component
|
|
8
|
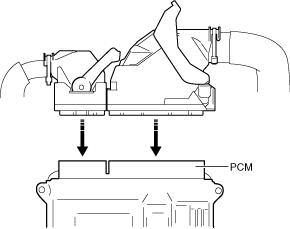
PCM
|
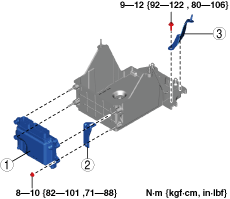
Step 2
am30jw00000037
|
|
1
|
PCM
|
|
2
|
Bracket A
|
|
3
|
Bracket B
|
Battery Removal Note
Battery Tray, PCM Component Removal Note
1. Remove the engine cover. (See ENGINE COVER REMOVAL/INSTALLATION [SKYACTIV-X 2.0].)
2. Remove the following parts. (See SIDE WALL REMOVAL/INSTALLATION [SKYACTIV-X 2.0].)
3. Remove the following parts as a single unit. (See AIR CLEANER REMOVAL/INSTALLATION [SKYACTIV-X 2.0].)
4. Remove the resonance chamber. (See AIR CLEANER REMOVAL/INSTALLATION [SKYACTIV-X 2.0].)
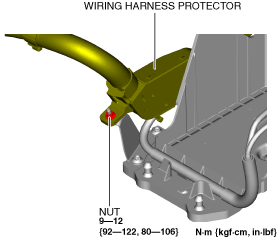
5. Remove the nut securing the wiring harness protector to the battery tray.
am3zzw00025278
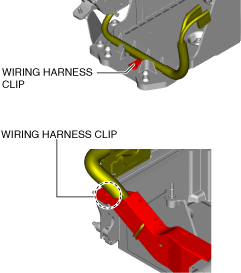
|
6. Release the wiring harness clips in the two locations shown in the figure.
am3zzw00025279
|
7. Remove the battery tray and PCM component as a single unit.
Battery Tray, PCM Component Installation Note
1. Install the wiring harness clips in the two locations shown in the figure.
am3zzw00025279
|
2. Install the nut securing the wiring harness protector to the battery tray.
am3zzw00025285
|
3. Install the resonance chamber. (See AIR CLEANER REMOVAL/INSTALLATION [SKYACTIV-X 2.0].)
4. Install the following parts as a single unit. (See AIR CLEANER REMOVAL/INSTALLATION [SKYACTIV-X 2.0].)
5. Tighten the battery tray installation bolts in the order shown in the figure.
ac30zw00003135
|
PCM Connector Connection Note
1. Install the battery tray and PCM component as a single unit.
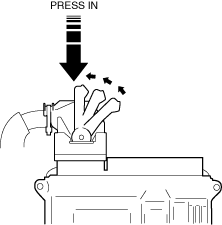
2. Connect the PCM connector using the following procedure.
am3zzw00035030
|
am3zzw00035031
|
am3zzw00035032
|
am3zzw00035033
|
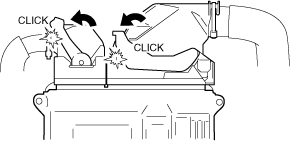
3. Press the PCM connector levers until a click sound is heard.
am3zzw00035034
|
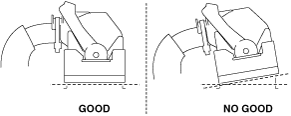
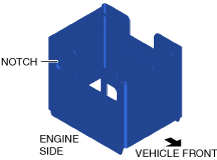
Battery Box Installation Note
1. Install the battery box so that the side with the bigger cutout points toward the engine side.
am3zzw00035036
|
Positive battery terminal connection note
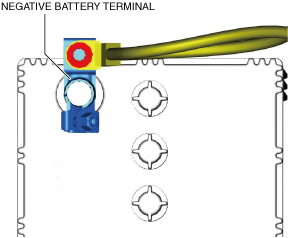
Negative battery terminal connection note
1. Connect the negative battery terminal so that the wiring harness does not block the upper part of the battery filler cap.
ac30zw00003136
|