 |
am3zzw00036850
STARTER REMOVAL/INSTALLATION [SKYACTIV-X 2.0]
id0119hf800200
Operation After Replacing Starter
|
Step |
Action |
|---|---|
|
1
|
Switch the ignition ON (engine off).
|
|
2
|
Apply the parking brake securely.
|
|
3
|
Shift the selector lever to the N position.
|
|
4
|
Depress and release the accelerator pedal 12 times with the brake pedal depressed.
|
|
5
|
Long-press the i-stop OFF switch (for 5 s or more).
|
|
6
|
Switch the ignition OFF.
|
|
7
|
Start the engine.
|
|
8
|
Verify that the i-stop warning light (amber) turns off.
• If the light does not turn off, switch the ignition OFF and repeat the procedure from Step 1.
|
|
9
|
Switch the ignition OFF and disconnect the negative battery terminal. (See NEGATIVE BATTERY TERMINAL DISCONNECTION/CONNECTION [(E)].)
|
|
10
|
Perform the battery condition initial setting (i-stop setting). (See BATTERY CONDITION INITIALIZATION SETTING (i-stop SETTING).)
|
Starter Removal/Installation
1. Disconnect the negative battery terminal. (See NEGATIVE BATTERY TERMINAL DISCONNECTION/CONNECTION [(E)].)
2. Open the engine cover. (See ENGINE COVER OPEN/CLOSE [SKYACTIV-X 2.0].)
3. Remove the left wall (rear) and left wall (front). (See SIDE WALL REMOVAL/INSTALLATION [SKYACTIV-X 2.0].)
4. Remove the following parts as a single unit. (See AIR CLEANER REMOVAL/INSTALLATION [SKYACTIV-X 2.0].)
5. Remove front under covers No.1 and No.2. (See FRONT UNDER COVER No.1 REMOVAL/INSTALLATION.)(See FRONT UNDER COVER No.2 REMOVAL/INSTALLATION.)
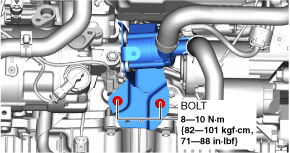
6. Remove the bolt shown in the figure.
am3zzw00036850
|
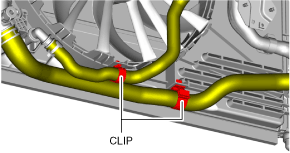
7. Disconnect the clips shown in the figure.
am3zzw00035970
|
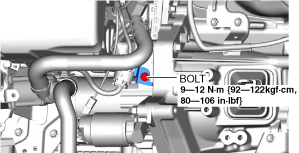
8. Remove the electric water pump installation bolt shown in the figure.
am3zzw00035971
|
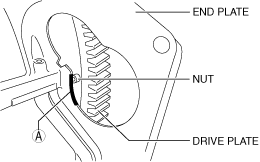
9. Remove using the procedure shown in the figure.
10. Install in the reverse order of removal.
am30jw00000574
|
|
1
|
Terminal B cable
|
|
2
|
Terminal S connector
|
|
3
|
Starter
|
Starter Installation Note (ATX)
am3zzw00027733
|