Specification (Reference)
am2zzw00012004
|
EXHAUST GAS PRESSURE SENSOR INSPECTION [SKYACTIV-D 1.8]
id0140s1446000
Exhaust Gas Pressure Sensor No.1
Visual inspection
1. Disconnect the negative battery terminal. (See NEGATIVE BATTERY TERMINAL DISCONNECTION/CONNECTION [(E)].)
2. Remove the engine cover. (See ENGINE COVER REMOVAL/INSTALLATION [SKYACTIV-D 1.8].)
3. Remove the exhaust gas pressure sensor No.1. (See EXHAUST GAS PRESSURE SENSOR REMOVAL/INSTALLATION [SKYACTIV-D 1.8].)
4. Visually inspect the exhaust gas pressure sensor No.1 for the following malfunction:
5. Visually inspect the air hose for the following malfunction:
Voltage inspection
1. Switch the ignition ON (engine off).
2. Connect the M-MDS to the DLC-2.
3. Start the engine.
4. Access the PID/DATA monitor item EX_PRES using the M-MDS. (See PID/DATA MONITOR INSPECTION.)(See PID/DATA MONITOR TABLE [PCM (SKYACTIV-D)].)
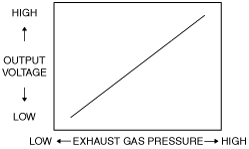
5. Verify that the PID EX_PRES value increases when the accelerator pedal is depressed.
Specification (Reference)
am2zzw00012004
|
Exhaust Gas Pressure Sensor No.2
Visual inspection
1. Disconnect the negative battery terminal. (See NEGATIVE BATTERY TERMINAL DISCONNECTION/CONNECTION [(E)].)
2. Lift up the vehicle.
3. Remove the front splash shield (RH). (See SPLASH SHIELD REMOVAL/INSTALLATION.)
4. Remove the front under cover No.2. (See FRONT UNDER COVER No.2 REMOVAL/INSTALLATION.)
5. Remove the exhaust gas pressure sensor No.2. (See EXHAUST GAS PRESSURE SENSOR REMOVAL/INSTALLATION [SKYACTIV-D 1.8].)
6. Visually inspect the exhaust gas pressure sensor No.2 for the following malfunction:
7. Visually inspect the air hose for the following malfunction:
Voltage inspection
1. Switch the ignition ON (engine off).
2. Connect the M-MDS to the DLC-2.
3. Start the engine.
4. Access the PID/DATA monitor item EX_GAS_DIF_PRES using the M-MDS. (See PID/DATA MONITOR INSPECTION.)(See PID/DATA MONITOR TABLE [PCM (SKYACTIV-D)].)
5. Start the engine.
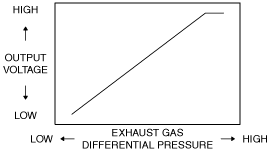
6. Verify that the PID EX_GAS_DIF_PRES value increases when the accelerator pedal is depressed.
Specification (Reference)
am2zzw00012006
|
Unit inspection
1. Switch the ignition ON (engine off).
2. Connect the M-MDS to the DLC-2.
3. Access the PID/DATA monitor item EX_GAS_DIF_PRES using the M-MDS. (See PID/DATA MONITOR INSPECTION.)(See PID/DATA MONITOR TABLE [PCM (SKYACTIV-D)].)
4. When the ignition is switched ON, verify the value of the PID item EX_GAS_DIF_PRES.
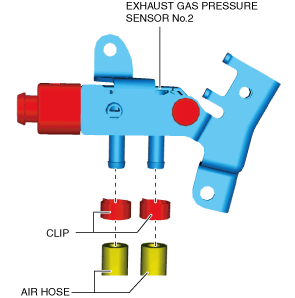
5. Disconnect the air hose at the position shown in the figure.
am3zzw00031301
|
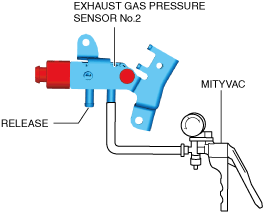
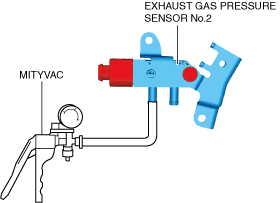
6. Install the Mityvac to the position shown in the figure.
am3zzw00031302
|
7. Verify the Mityvac gauge value and PID item EX_GAS_DIF_PRES when pressure is applied to exhaust gas pressure sensor No.2.
8. Install the Mityvac to the position shown in the figure.
am3zzw00031303
|
9. Verify the value of the PID item EX_GAS_DIF_PRES when 110 kPa of pressure is applied to exhaust gas pressure sensor No.2.