 |
am3zzw00028185
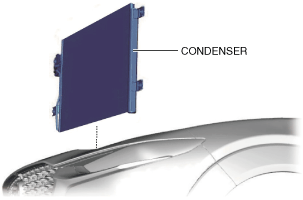
CONDENSER REMOVAL/INSTALLATION [SKYACTIV-D 1.8]
id0711008012l6
Replacement Part
|
O-ring (cooler hose (HI))
Quantity: 1
Location of use: Condenser
|
O-ring (cooler pipe)
Quantity: 1
Location of use: Condenser
|
1. Disconnect the negative battery terminal. (See NEGATIVE BATTERY TERMINAL DISCONNECTION/CONNECTION [(E)].)
2. Discharge the refrigerant.(See REFRIGERANT CHARGING [(E)].)
3. Remove the front under cover No.1 and the front under cover No.2. (See FRONT UNDER COVER No.1 REMOVAL/INSTALLATION.) (See FRONT UNDER COVER No.2 REMOVAL/INSTALLATION.)
4. Drain the engine coolant and water-cooled charge air cooler coolant. (See ENGINE COOLANT REPLACEMENT [SKYACTIV-D 1.8].) (See WATER-COOLED CHARGE AIR COOLER COOLANT REPLACEMENT [SKYACTIV-D 1.8].)
5. Remove the following parts:
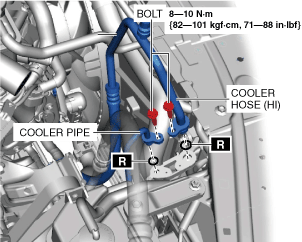
6. Remove the bolts.
am3zzw00028185
|
7. Disconnect the cooler hose (HI) and cooler pipe. Do not allow remaining compressor oil in the refrigerant line to spill.
8. Remove the condenser, being careful not to allow remaining compressor oil in the condenser to spill. (See Condenser Installation Note.)
ac30zw00001862
|
9. Install in the reverse order of removal.
10. Inspect for engine coolant leakage and water-cooled charge air cooler coolant leakage. (See ENGINE COOLANT LEAKAGE INSPECTION [SKYACTIV-D 1.8].) (See WATER-COOLED CHARGE AIR COOLER COOLANT LEAKAGE INSPECTION [SKYACTIV-D 1.8].)
11. Perform the refrigerant system performance test. (See REFRIGERANT SYSTEM PERFORMANCE TEST [(E)].)
Condenser Installation Note
1. After replacing the condenser, add compressor oil to the refrigeration cycle.