 |
ac5wzw00008860
REFRIGERANT PRESSURE SENSOR REMOVAL/INSTALLATION [FULL-AUTO AIR CONDITIONER (E)]
id0740a18173y2
Replacement Part
|
O-ring
Quantity: 1
Location of use: Refrigerant pressure sensor
|
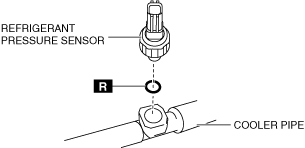
Refrigerant Pressure Sensor No.1
1. Disconnect the negative battery terminal. (See NEGATIVE BATTERY TERMINAL DISCONNECTION/CONNECTION [(E)].)
2. Discharge the refrigerant. (See REFRIGERANT RECOVERY.) (See REFRIGERANT CHARGING [(E)].)
3. Remove the plug hole plate. (SKYACTIV-G) (See PLUG HOLE PLATE REMOVAL/INSTALLATION [SKYACTIV-G (WITHOUT CYLINDER DEACTIVATION (E))].) (See PLUG HOLE PLATE REMOVAL/INSTALLATION [SKYACTIV-G (WITH CYLINDER DEACTIVATION (E))].)
4. Remove the engine cover. (SKYACTIV-D 1.8, SKYACTIV-X 2.0) (See ENGINE COVER REMOVAL/INSTALLATION [SKYACTIV-D 1.8].) (See ENGINE COVER REMOVAL/INSTALLATION [SKYACTIV-X 2.0].)
5. Remove the cooler pipe. (See REFRIGERANT LINE REMOVAL/INSTALLATION [SKYACTIV-G].) (See REFRIGERANT LINE REMOVAL/INSTALLATION [SKYACTIV-D 1.8].) (See REFRIGERANT LINE REMOVAL/INSTALLATION [SKYACTIV-X 2.0].)
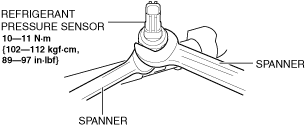
6. Loosen the refrigerant pressure sensor using two spanners.
ac5wzw00008860
|
7. Remove the refrigerant pressure sensor.
am3zzw00028257
|
8. Install in the reverse order of removal. (See Refrigerant pressure sensor installation note.)
9. Perform the refrigerant system performance test. (See REFRIGERANT SYSTEM PERFORMANCE TEST [(E)].)
Refrigerant pressure sensor installation note
1. Apply compressor oil to the O-rings and connect the joints.
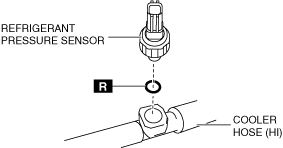
Refrigerant Pressure Sensor No.2
1. Disconnect the negative battery terminal. (See NEGATIVE BATTERY TERMINAL DISCONNECTION/CONNECTION [(E)].)
2. Discharge the refrigerant. (See REFRIGERANT RECOVERY.) (See REFRIGERANT CHARGING [(E)].)
3. Remove the plug hole plate. (SKYACTIV-G) (See PLUG HOLE PLATE REMOVAL/INSTALLATION [SKYACTIV-G (WITHOUT CYLINDER DEACTIVATION (E))].) (See PLUG HOLE PLATE REMOVAL/INSTALLATION [SKYACTIV-G (WITH CYLINDER DEACTIVATION (E))].)
4. Remove the engine cover. (SKYACTIV-D 1.8, SKYACTIV-X 2.0) (See ENGINE COVER REMOVAL/INSTALLATION [SKYACTIV-D 1.8].) (See ENGINE COVER REMOVAL/INSTALLATION [SKYACTIV-X 2.0].)
5. Remove the cooler hose (HI). (See REFRIGERANT LINE REMOVAL/INSTALLATION [SKYACTIV-G].) (See REFRIGERANT LINE REMOVAL/INSTALLATION [SKYACTIV-D 1.8].) (See REFRIGERANT LINE REMOVAL/INSTALLATION [SKYACTIV-X 2.0].)
6. Loosen the refrigerant pressure sensor using two spanners.
ac5wzw00008860
|
7. Remove the refrigerant pressure sensor.
am3zzw00028258
|
8. Install in the reverse order of removal. (See Refrigerant pressure sensor installation note.)
9. Perform the refrigerant system performance test. (See REFRIGERANT SYSTEM PERFORMANCE TEST [(E)].)
Refrigerant pressure sensor installation note
1. Apply compressor oil to the O-rings and connect the joints.