Home

Mazdamanuals.com

 FUEL TANK REMOVAL/INSTALLATION [L3 4WD]

FUEL TANK REMOVAL/INSTALLATION [L3 4WD]


id0114b18016b3

Warning
• Repairing a fuel tank that has not been properly steam cleaned can be dangerous. Explosion or fire may cause death or serious injury. Always properly steam clean a fuel tank before repairing it.
• Fuel line spills and leakage are dangerous. Fuel can ignite and cause serious injuries or death and damage. Fuel can also irritate skin and eyes. To prevent this, do not damage the sealing surface of the fuel pump unit when removing or installing.
• A person charged with static electricity could cause a fire or explosion, resulting in death or serious injury. Before draining fuel, make sure to discharge static electricity by touching the vehicle body.
Caution
• Disconnecting/connecting the quick release connector without cleaning it may possibly cause damage to the fuel pipe and quick release connector. Always clean the quick release connector joint area before disconnecting/connecting using a cloth or soft brush, and make sure that it is free of foreign material.

1. Level the vehicle.

2. Complete the "BEFORE REPAIR PROCEDURE".

3. Disconnect the negative battery cable.

4. Remove the fuel pump unit. (See FUEL PUMP UNIT REMOVAL/INSTALLATION [L3 4WD].)

5. Remove the fuel gauge sender sub-unit. (See FUEL GAUGE SENDER UNIT REMOVAL/INSTALLATION [4WD].)

6. Siphon the fuel from the service hole.

7. Remove the presilencer. (See EXHAUST SYSTEM REMOVAL/INSTALLATION [L3 4WD].)

8. Remove the TWC. (See EXHAUST SYSTEM REMOVAL/INSTALLATION [L3 4WD].)

9. Remove the propeller shaft. (See PROPELLER SHAFT REMOVAL/INSTALLATION [JA5AX-EL].)

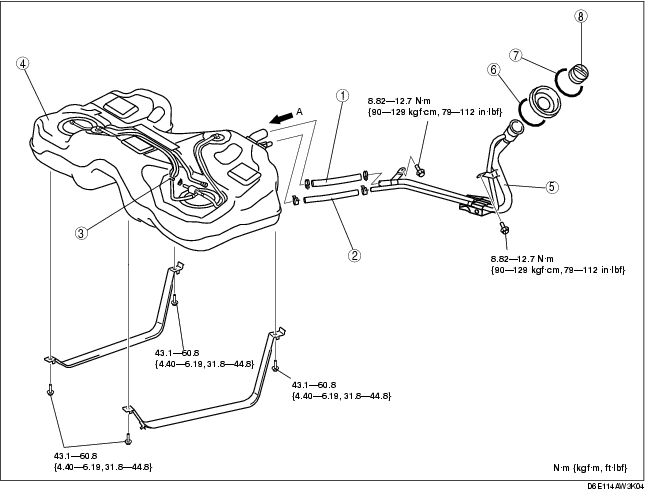
10. Remove in the order indicated in the table.

11. Install in the reverse order of removal.

12. Complete the "AFTER REPAIR PROCEDURE".

1
Joint hose
2
Breather hose
3
Evaporative hose
4
Fuel tank
5
Fuel-filler pipe
6
O-ring
7
Gasket
8
Filler cap

Evaporative Hose Installation Note

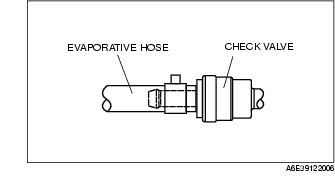
1. Fit the evaporative hose until it hits the check valve as shown.

Breather Hose Installation Note

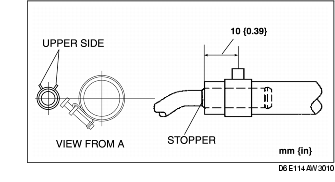
1. Fit the breather hose onto the respective fittings, and install clamps as shown.

Joint Hose Installation Note

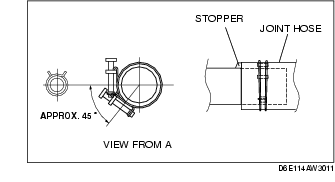
1. Fit the joint hose onto the respective fittings, and install clamps as shown.