 |
am3zzw00028182
A/C COMPRESSOR REMOVAL/INSTALLATION [SKYACTIV-D 1.8]
id0711008010l6
Replacement Part
|
O-ring (cooler hose (HI))
Quantity: 1
Location of use: A/C compressor
|
O-ring (cooler hose (LO))
Quantity: 1
Location of use: A/C compressor
|
1. Disconnect the negative battery terminal. (See NEGATIVE BATTERY TERMINAL DISCONNECTION/CONNECTION [(E)].)
2. Discharge the refrigerant.(See REFRIGERANT CHARGING [(E)].)
3. Remove the following parts:
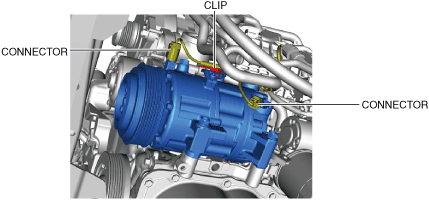
4. Disconnect the connectors.
am3zzw00028182
|
5. Detach the clip.
6. Remove bolts.
am3zzw00028183
|
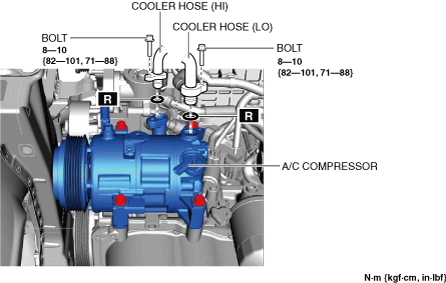
7. Disconnect the cooler hose (HI). Do not allow compressor oil to spill.
8. Disconnect the cooler hose (LO). Do not allow compressor oil to spill.
9. Remove bolts.
am3zzw00028184
|
10. Remove the A/C compressor. Do not allow compressor oil to spill. (See A/C Compressor Installation Note.)
11. Install in the reverse order of removal.
12. Perform the refrigerant system performance test. (See REFRIGERANT SYSTEM PERFORMANCE TEST [(E)].)
A/C Compressor Installation Note
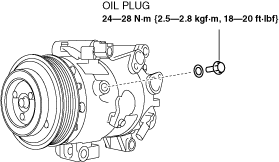
1. Remove the oil plug from the new A/C compressor and the old A/C compressor.
am3zzw00038216
|
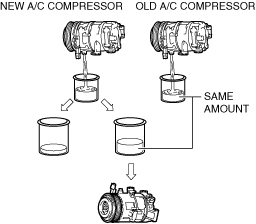
2. Drain the oil from the new A/C compressor into a clean measuring container.
3. Drain the oil from the old A/C compressor into a clean measuring container separate from the one used in Step 2.
4. Compare the amount of oil drained in Step 2 with the amount of oil drained in Step 3.
5. Adjust the oil drained in Step 2 so that it is the same amount as the oil drained from the old A/C compressor and add it into the new A/C compressor.
am3zzw00038217
|
Compressor oil
|
Type |
Sealed volume (Approx. quantity) |
|---|---|
|
FD46XG
|
100 ml {100 cc, 3.38 US fl oz }
|
6. Install the oil plug.