 |
JOINT SHAFT REMOVAL/INSTALLATION [L8, LF, L3, MZR-CD (RF Turbo)]
id0313008009b6
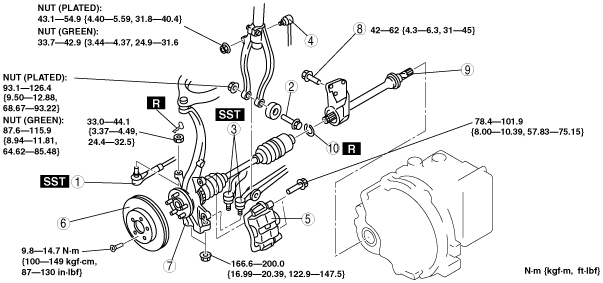
1. Drain the transaxle oil. (See TRANSAXLE OIL REPLACEMENT [G35M-R].) (See TRANSAXLE OIL REPLACEMENT [G66M-R].) (See TRANSAXLE OIL REPLACEMENT [A26M-R].) (See AUTOMATIC TRANSAXLE FLUID (ATF) REPLACEMENT [JA5AX-EL].)
2. Remove the ABS wheel-speed sensor. (See FRONT ABS WHEEL-SPEED SENSOR REMOVAL/INSTALLATION.)
3. Remove in the order indicated in the table.
4. Install in the reverse order of removal.
am6zzw00009490
|
|
1
|
Tie-rod end ball joint
|
|
2
|
bolt
|
|
3
|
Lower arm (front, rear) ball joint
|
|
4
|
Stabilizer control link
|
|
5
|
Brake caliper component
|
|
6
|
Disk plate
|
|
7
|
Wheel hub, steering knuckle and drive shaft
|
|
8
|
Joint shaft bracket bolt
|
|
9
|
Joint shaft
|
|
10
|
Clip
(See Clip Installation Note)
|
Brake Caliper Component Removal Note
1. Suspend the caliper aside with wire.
am6zzw00009491
|
Wheel Hub, Steering Knuckle and Drive Shaft Removal Note
1. Pull the joint shaft straight out.
2. Install the SST to the transaxle after the joint shaft is removed.
am6zzw00009492
|
Clip Installation Note
1. Install a new clip onto the joint shaft with the opening facing upward. Ensure that the diameter of the clip does not exceed the specification on installation.
2. After installation, measure the outer diameter. If it exceeds the specification, repeat Step 1 using a new clip.
am6zzw00009493
|