 |
am3zzw00034943
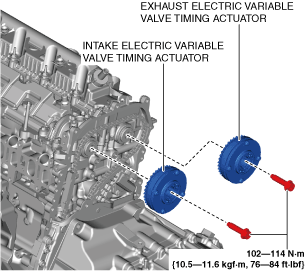
ELECTRIC VARIABLE VALVE TIMING ACTUATOR REMOVAL/INSTALLATION [SKYACTIV-X 2.0]
id0110hf127000
1. Disconnect the negative battery terminal. (See NEGATIVE BATTERY TERMINAL DISCONNECTION/CONNECTION [(E)].)
2. Remove the engine cover. (See ENGINE COVER REMOVAL/INSTALLATION [SKYACTIV-X 2.0].)
3. Remove the cylinder head cover. (See CYLINDER HEAD COVER REMOVAL/INSTALLATION [SKYACTIV-X 2.0].)
4. Remove the intake electric variable valve timing motor/driver and the exhaust electric variable timing motor/driver. (See ELECTRIC VARIABLE VALVE TIMING MOTOR/DRIVER REMOVAL/INSTALLATION [SKYACTIV-X 2.0].)
5. Remove the engine rear cover (upper). (See ENGINE REAR COVER REMOVAL/INSTALLATION [SKYACTIV-X 2.0].)
6. Remove the timing chain tensioner. (See TIMING CHAIN REMOVAL/INSTALLATION [SKYACTIV-X 2.0].)
7. Move the tensioner arm.
8. Remove the chain guide (No.1). (See TIMING CHAIN REMOVAL/INSTALLATION [SKYACTIV-X 2.0].)
9. Remove the intake variable valve timing actuator or the exhaust variable valve timing actuator.
am3zzw00034943
|
10. Install in the reverse order of removal.