 |
am3zzw00035774
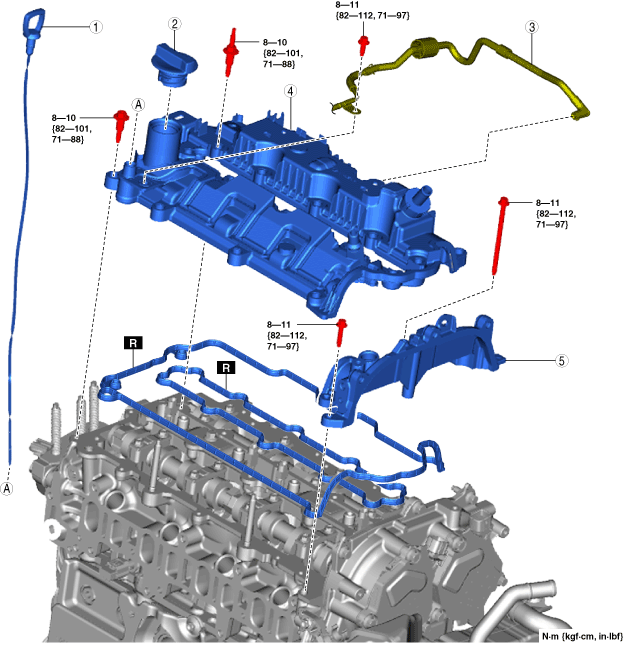
CYLINDER HEAD COVER REMOVAL/INSTALLATION [SKYACTIV-X 2.0]
id0110hf802900
Oil and chemical type
|
Sealant
Type: TB1217D
|
1. Open the engine cover. (See ENGINE COVER OPEN/CLOSE [SKYACTIV-X 2.0].)
2. Remove the seal cover. (See SEAL COVER REMOVAL/INSTALLATION [SKYACTIV-X 2.0].)
3. Remove the injection pipe. (See INJECTION PIPE REMOVAL/INSTALLATION [SKYACTIV-X 2.0].)
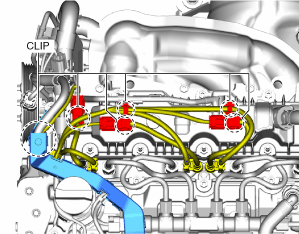
4. To remove the common rail, remove or disconnect the following parts.
5. Remove the fuel distributor.(See FUEL DISTRIBUTOR REMOVAL/INSTALLATION [SKYACTIV-X 2.0].)
6. Remove the protect. (See SEAL COVER REMOVAL/INSTALLATION [SKYACTIV-X 2.0].)
7. Disconnect the ventilation hose on the cylinder head cover side. (See QUICK RELEASE CONNECTOR (EMISSION SYSTEM) REMOVAL/INSTALLATION [SKYACTIV-X 2.0].)
8. Disconnect the PCV hose from the cylinder head cover. (See POSITIVE CRANKCASE VENTILATION (PCV) VALVE REMOVAL/INSTALLATION [SKYACTIV-X 2.0].)
9. Disconnect the following connectors.
10. Disconnect the wiring harness clips.
am3zzw00035774
|
11. Remove the fuel distributor bracket. (See FUEL DISTRIBUTOR REMOVAL/INSTALLATION [SKYACTIV-X 2.0].)
12. Remove using the procedure shown in the figure.
13. Install in the reverse order of removal.
am3zzw00035775
|
|
1
|
Dipstick
|
|
2
|
Oil filler cap
|
|
3
|
Vacuum hose
|
|
4
|
Cylinder head cover
|
|
5
|
Rear housing
|
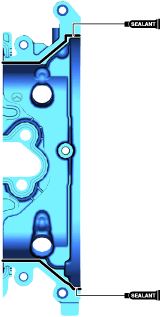
Rear Housing Installation Note
1. Apply silicone sealant (TB1217D) to the positions shown in the figure.
am3zzw00035879
|
2. Install the rear housing.
Cylinder Head Cover Installation Note
1. Apply silicone sealant (TB1217D) to the positions shown in the figure.
am3zzw00035880
|
2. Insert the cylinder head cover gasket into the groove of the cylinder head cover.
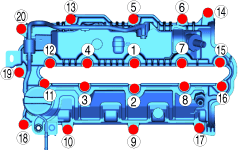
3. Temporarily tighten the cylinder head cover bolts shown in the figure.
am3zzw00035881
|
4. Tighten the cylinder head cover bolts in the order shown in the figure.
am3zzw00035882
|