 |
am3zzw00034958
DRIVE BELT REMOVAL/INSTALLATION [SKYACTIV-X 2.0]
id0110hf801600
Water Pump Drive Belt Removal/Installation
1. Remove the engine cover. (See ENGINE COVER REMOVAL/INSTALLATION [SKYACTIV-X 2.0].)
2. Remove the following parts. (See SIDE WALL REMOVAL/INSTALLATION [SKYACTIV-X 2.0].)
3. Remove the splash shield (RH). (See SPLASH SHIELD REMOVAL/INSTALLATION)
4. Set the cooler pipe (LO) aside.
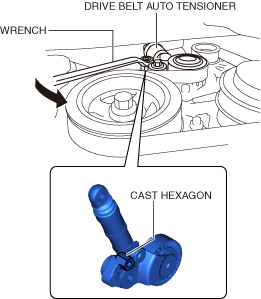
5. Attach a wrench to the cast hexagon part of the drive belt auto tensioner and slowly rotate the drive belt auto tensioner in the direction shown in the figure to release the tension.
am3zzw00034958
|
6. Remove the water pump drive belt.
7. Install the water pump drive belt.
8. Rotate the crankshaft pulley clockwise approx. 180 degrees and verify that the water pump drive belt is installed correctly.
9. Verify that the drive belt auto tensioner indicator is in the normal range. (See DRIVE BELT INSPECTION [SKYACTIV-X 2.0].)
10. Return the cooler pipe (LO) to the original position.
11. Install the following parts. (See SIDE WALL REMOVAL/INSTALLATION [SKYACTIV-X 2.0].)
12. Install the engine cover. (See ENGINE COVER REMOVAL/INSTALLATION [SKYACTIV-X 2.0].)
Generator Drive Belt Removal/Installation
1. Turn the steering wheel completely to the right.
2. Remove the splash shield (RH). (See SPLASH SHIELD REMOVAL/INSTALLATION.)
3. Set the water pump drive belt aside. (See Water Pump Drive Belt Removal/Installation.)
4. Remove the decoupling ring tensioner. (See DECOUPLING RING TENSIONER REMOVAL/INSTALLATION [SKYACTIV-X 2.0].)
5. Remove the generator drive belt.
6. Install the generator drive belt.
7. Install the decoupling ring tensioner. (See DECOUPLING RING TENSIONER REMOVAL/INSTALLATION [SKYACTIV-X 2.0].)
8. Rotate the crankshaft pulley clockwise approx. 180 degrees and verify that the generator drive belt is installed correctly.
9. Verify that the decoupling ring tensioner indicator is in the normal range. (See DRIVE BELT INSPECTION [SKYACTIV-X 2.0].)
10. Install the splash shield (RH). (See SPLASH SHIELD REMOVAL/INSTALLATION.)
11. Return the steering wheel to the original position.