DASHBOARD SIDE COVER REMOVAL/INSTALLATION
DASHBOARD SIDE COVER REMOVAL/INSTALLATION
id091700612500
Driver-side
1. Disconnect the negative battery terminal. (See NEGATIVE BATTERY TERMINAL DISCONNECTION/CONNECTION [(E)].)
2. Remove the following parts:
- (1) Driver-side front scuff plate (See FRONT SCUFF PLATE REMOVAL/INSTALLATION.)
-
- (2) Driver-side front side trim (See FRONT SIDE TRIM REMOVAL/INSTALLATION.)
-
- (3) Driver-side decoration panel (See DECORATION PANEL REMOVAL/INSTALLATION.)
-
- (4) Passenger-side decoration panel (See DECORATION PANEL REMOVAL/INSTALLATION.)
-
- (5) Driver-side lower panel (See LOWER PANEL REMOVAL/INSTALLATION [(E)].)
-
- (6) A-pillar trim (See A-PILLAR TRIM REMOVAL/INSTALLATION [(E)].)
-
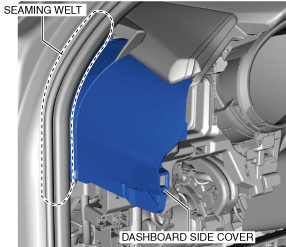
3. Partially peel back the seaming welt.
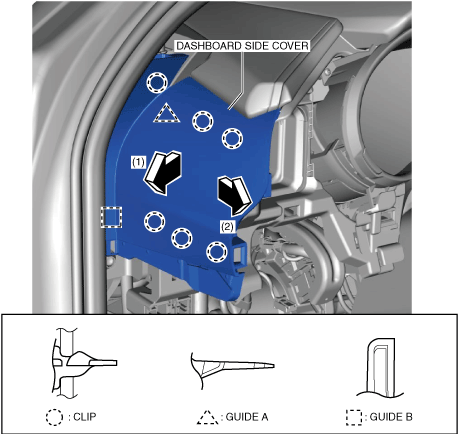
4. Move the dashboard side cover in the order of arrows (1) and (2) shown in the figure, and remove it while detaching the clips and guide.
5. Install in the reverse order of removal.
Passenger-side
1. Disconnect the negative battery terminal. (See NEGATIVE BATTERY TERMINAL DISCONNECTION/CONNECTION [(E)].)
2. Remove the following parts:
- (1) Passenger-side front scuff plate (See FRONT SCUFF PLATE REMOVAL/INSTALLATION.)
-
- (2) Passenger-side front side trim (See FRONT SIDE TRIM REMOVAL/INSTALLATION.)
-
- (3) Passenger-side decoration panel (See DECORATION PANEL REMOVAL/INSTALLATION.)
-
- (4) Glove compartment (without passenger-side knee air bag module) (See GLOVE COMPARTMENT REMOVAL/INSTALLATION.)
-
- (5) Dashboard under cover (See DASHBOARD UNDER COVER REMOVAL/INSTALLATION.)
-
- (6) Passenger-side lower panel (See LOWER PANEL REMOVAL/INSTALLATION [(E)].)
-
- (7) A-pillar trim (See A-PILLAR TRIM REMOVAL/INSTALLATION [(E)].)
-
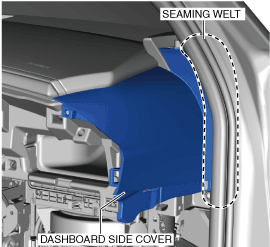
3. Partially peel back the seaming welt.
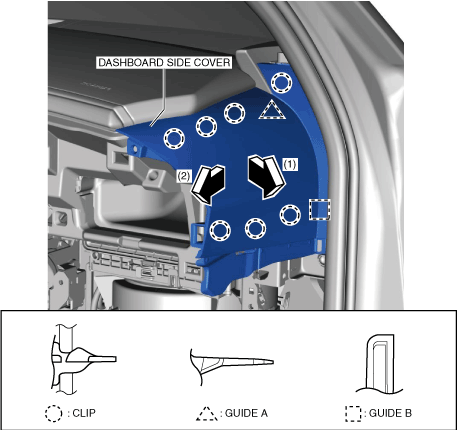
4. Move the dashboard side cover in the order of arrows (1) and (2) shown in the figure, and remove it while detaching the clips and guide.
5. Install in the reverse order of removal.