Home

Mazdamanuals.com

LOWER PANEL REMOVAL/INSTALLATION [(E)]

LOWER PANEL REMOVAL/INSTALLATION [(E)]


id0917008011x2


Driver-side

1.  Disconnect the negative battery terminal. (See NEGATIVE BATTERY TERMINAL DISCONNECTION/CONNECTION [(E)].)

2.  Remove the following parts:

(1)  Driver-side front scuff plate (See FRONT SCUFF PLATE REMOVAL/INSTALLATION.)
(2)  Driver-side front side trim (See FRONT SIDE TRIM REMOVAL/INSTALLATION.)
(3)  Driver-side decoration panel (See DECORATION PANEL REMOVAL/INSTALLATION.)
(4)  Passenger-side decoration panel (See DECORATION PANEL REMOVAL/INSTALLATION.)

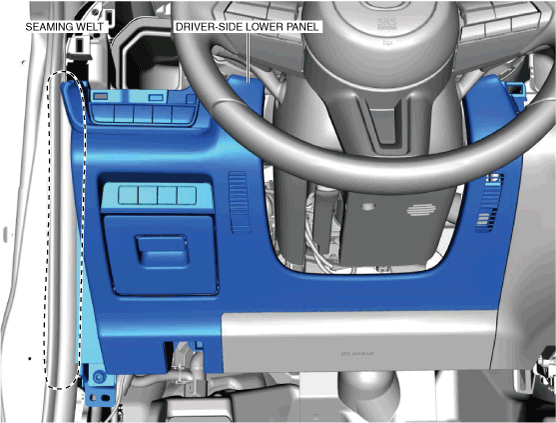
3.  Partially peel back the seaming welt.

ac30zw00000288

4.  Remove the bolt.

am3zzw00029601

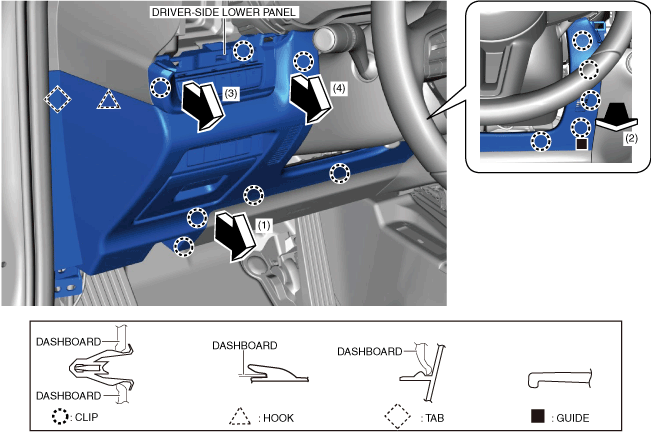
5.  Move the driver-side lower panel in the order of arrows (1), (2), (3) and (4) shown in the figure, and remove the clips, hook, tab, and guide.

ac30zw00000289

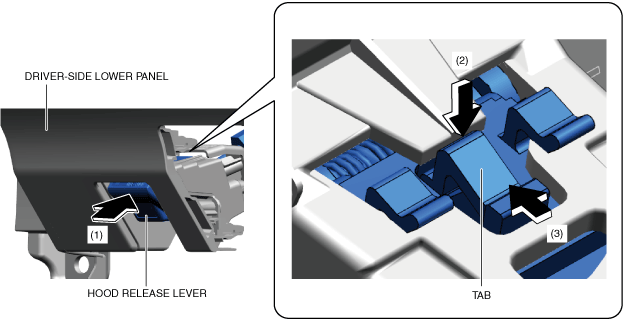
6.  While pressing the hood release lever in the direction of arrow (1) shown in the figure, press the tab in the direction of arrow (2) and detach the tab from the driver-side lower panel.

ac30zw00004975

7.  Remove the hood release lever in the direction of arrow (3) shown in the figure.

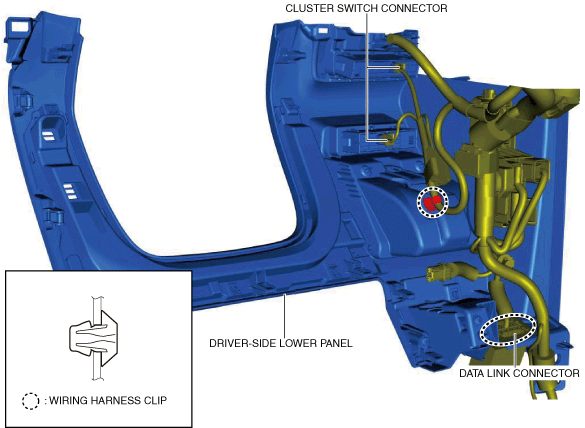
8.  Disconnect the cluster switch connectors.

ac30zw00000290

9.  Remove the data link connector.

10.  Remove the wiring harness clip.

11.  Install in the reverse order of removal.

Note
•  When replacing the driver-side lower panel, remove the cluster switch. (See CLUSTER SWITCH REMOVAL/INSTALLATION.)


Center

1.  Disconnect the negative battery terminal. (See NEGATIVE BATTERY TERMINAL DISCONNECTION/CONNECTION [(E)].)

2.  Remove the following parts:

(1)  Shift lever knob (MTX) (See SHIFT LEVER REMOVAL/INSTALLATION [C66M-R, C66MX-R].)
(2)  Selector lever knob (ATX) (See SELECTOR LEVER COMPONENT REMOVAL/INSTALLATION.)
(3)  Upper panel (See UPPER PANEL REMOVAL/INSTALLATION.)
(4)  Console side panel (See CONSOLE SIDE PANEL REMOVAL/INSTALLATION.)
(5)  Shift panel (See SHIFT PANEL REMOVAL/INSTALLATION.)
(6)  Front console box (See FRONT CONSOLE BOX REMOVAL/INSTALLATION.)
(7)  Cup holder (See CUP HOLDER REMOVAL/INSTALLATION.)
(8)  Side wall (See SIDE WALL REMOVAL/INSTALLATION.)
(9)  Rear console (See REAR CONSOLE REMOVAL/INSTALLATION [(E)].)
(10)  Driver-side front scuff plate (See FRONT SCUFF PLATE REMOVAL/INSTALLATION.)
(11)  Driver-side front side trim (See FRONT SIDE TRIM REMOVAL/INSTALLATION.)
(12)  Driver-side decoration panel (See DECORATION PANEL REMOVAL/INSTALLATION.)
(13)  Passenger-side decoration panel (See DECORATION PANEL REMOVAL/INSTALLATION.)
(14)  Hood release lever (See HOOD RELEASE LEVER AND RELEASE CABLE REMOVAL/INSTALLATION [(E)].)
(15)  Driver-side lower panel (See LOWER PANEL REMOVAL/INSTALLATION [(E)].)
(16)  Driver-side knee air bag module (See KNEE AIR BAG MODULE REMOVAL/INSTALLATION [TWO-STEP DEPLOYMENT CONTROL SYSTEM].)

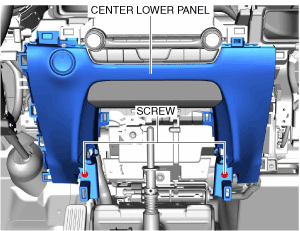
3.  Remove the screws.

am3zzw00029604

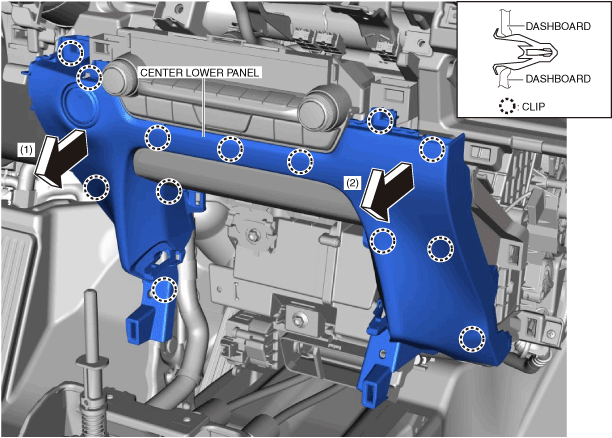
4.  Move the center lower panel in the order of arrows (1) and (2), and remove it while detaching the clips.

ac30zw00000291

5.  Disconnect the push button start connector.

6.  Install in the reverse order of removal.

Note
•  When replacing the center lower panel, remove the push button start. (See PUSH BUTTON START REMOVAL/INSTALLATION.)


Passenger-side


Removal

1.  Remove the following parts:

(1)  Passenger-side front scuff plate (See FRONT SCUFF PLATE REMOVAL/INSTALLATION.)
(2)  Passenger-side front side trim (See FRONT SIDE TRIM REMOVAL/INSTALLATION.)
(3)  Passenger-side decoration panel (See DECORATION PANEL REMOVAL/INSTALLATION.)
(4)  Glove compartment (See GLOVE COMPARTMENT REMOVAL/INSTALLATION.)
(5)  Dashboard under cover (See DASHBOARD UNDER COVER REMOVAL/INSTALLATION.)

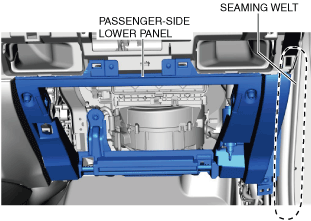
2.  Partially peel back the seaming welt.

am3zzw00029610

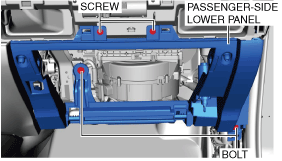
3.  Remove the bolts.

ac30zw00000292

4.  Remove the screws.

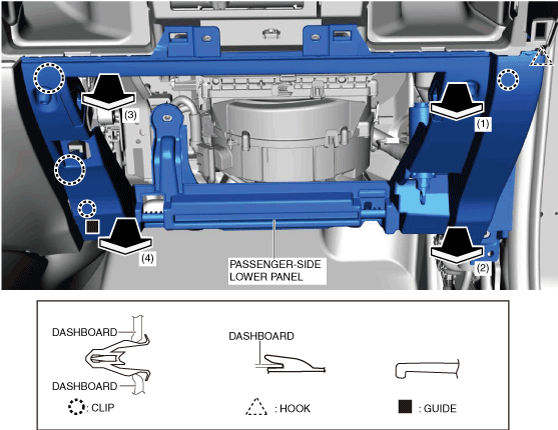
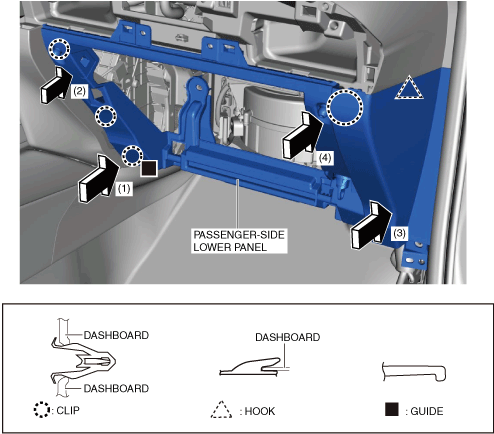
5.  Move the passenger-side lower panel in the order of arrows (1), (2), (3), and (4) shown in the figure, and remove it while detaching the clips, tab, hook, and guide.

am3zzw00029612

6.  Disconnect the passenger air bag deactivation (PAD) switch connector. (with passenger air bag deactivation (PAD) switch)

Note
•  When replacing the passenger-side lower panel, remove the passenger air bag deactivation (PAD) switch. (with passenger air bag deactivation (PAD) switch) (See PASSENGER AIR BAG DEACTIVATION (PAD) SWITCH REMOVAL/INSTALLATION [TWO-STEP DEPLOYMENT CONTROL SYSTEM].)


Installation

1.  Connect the passenger air bag deactivation (PAD) switch connector. (with passenger air bag deactivation (PAD) switch)

2.  Install the clips, tab, hook, and guide while pressing the passenger-side lower panel in the order of arrows (1), (2), (3), and (4) shown in the figure.

ac30zw00000293

3.  Assemble the passenger-side lower panel to the dashboard and tighten the bolts and screws temporarily.

ac30zw00000292

4.  Install the glove compartment. (See GLOVE COMPARTMENT REMOVAL/INSTALLATION.)

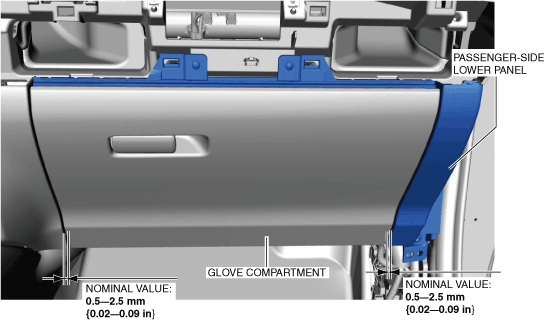
5.  Measure the gap between the glove compartment and the passenger-side lower panel and verify that the measured value is within the nominal value.

•  If not within the nominal value, move the passenger-side lower panel and adjust the installation position.
am3zzw00029614

6.  Remove the glove compartment. (See GLOVE COMPARTMENT REMOVAL/INSTALLATION.)

7.  Tighten the bolts and screws completely.

am3zzw00029615

8.  Install the following parts:

(1)  Dashboard under cover (See DASHBOARD UNDER COVER REMOVAL/INSTALLATION.)
(2)  Passenger-side decoration panel (See DECORATION PANEL REMOVAL/INSTALLATION.)
(3)  Passenger-side front side trim (See FRONT SIDE TRIM REMOVAL/INSTALLATION.)
(4)  Passenger-side front scuff plate (See FRONT SCUFF PLATE REMOVAL/INSTALLATION.)
(5)  Glove compartment (See GLOVE COMPARTMENT REMOVAL/INSTALLATION.)

9.  Install the seaming welt.

am3zzw00029610