 |
am3zzw00035770
THERMOSTAT REMOVAL/INSTALLATION [SKYACTIV-X 2.0]
id0112hf801200
1. Disconnect the negative battery terminal. (See NEGATIVE BATTERY TERMINAL DISCONNECTION/CONNECTION [(E)].)
2. Remove the engine cover. (See ENGINE COVER REMOVAL/INSTALLATION [SKYACTIV-X 2.0].)
3. Remove the following parts.(See SIDE WALL REMOVAL/INSTALLATION [SKYACTIV-X 2.0].)
4. Drain the engine coolant. (See ENGINE COOLANT REPLACEMENT [SKYACTIV-X 2.0].)
5. Remove the cooling fan motor. (See COOLING FAN MOTOR REMOVAL/INSTALLATION [SKYACTIV-X 2.0].)
6. Remove the decoupling ring tensioner. (See DECOUPLING RING TENSIONER REMOVAL/INSTALLATION [SKYACTIV-X 2.0]
7. Remove the A/C compressor with the pipes connected and secure the A/C compressor using wire or rope so that it does not interfere with the work. (See A/C COMPRESSOR REMOVAL/INSTALLATION [SKYACTIV-X 2.0])
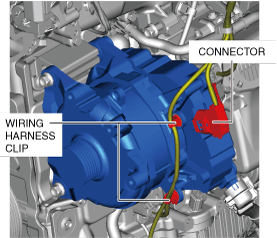
8. Disconnect the wiring harness clips and connector of the integrated starter generator (ISG).
am3zzw00035770
|
9. Disconnect terminal B. (See INTEGRATED STARTER GENERATOR (ISG) REMOVAL/INSTALLATION [SKYACTIV-X 2.0])
10. Remove the bolt shown in the figure. (See INTEGRATED STARTER GENERATOR (ISG) REMOVAL/INSTALLATION [SKYACTIV-X 2.0])
am3zzw00037026
|
11. Rotate the integrated starter generator (ISG) in the direction of the arrow shown in the figure.
12. Remove the insulator shown in the figure.
am3zzw00037027
|
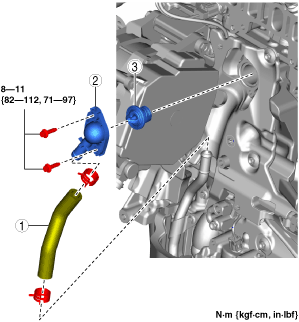
13. Remove using the procedure shown in the figure.
14. Install in the reverse order of removal.
15. Add engine coolant. (See ENGINE COOLANT REPLACEMENT [SKYACTIV-X 2.0].)
16. Inspect for engine coolant leakage. (See ENGINE COOLANT LEAKAGE INSPECTION [SKYACTIV-X 2.0].)
am3zzw00035619
|
|
1
|
Lower radiator hose
|
|
2
|
Thermostat cover
|
|
3
|
Thermostat
|