 |
am3zzw00032004
MAGNETIC CLUTCH DISASSEMBLY/ASSEMBLY [SKYACTIV-X 2.0]
id0711000063l7
Replacement Part
|
Bolt
Quantity: 1
Location of use: Magnetic clutch
|
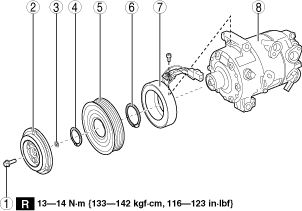
Magnetic Clutch is Disassembled/Assembled with A/C Compressor Removed from Vehicle
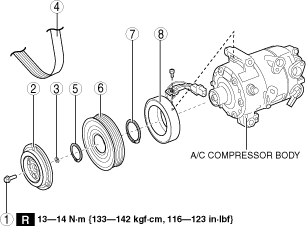
1. Disassemble in the order indicated in the table.
am3zzw00032004
|
|
1
|
Bolt
(See Bolt removal/installation.)
|
|
2
|
Pressure plate
|
|
3
|
Shim
|
|
4
|
Snap ring
|
|
5
|
A/C compressor pulley
|
|
6
|
Snap ring
|
|
7
|
Stator
|
|
8
|
A/C compressor body
|
2. Assemble in the reverse order of disassembly.
3. Adjust the magnetic clutch clearance. (See MAGNETIC CLUTCH ADJUSTMENT [SKYACTIV-X 2.0].)
Bolt removal/installation
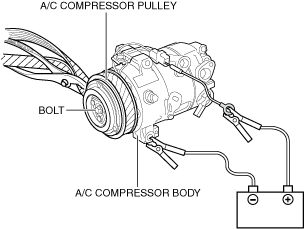
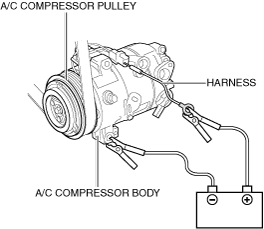
1. Connect the harness to the magnetic clutch connector.
am3zzw00032005
|
2. Connect the battery (+) cable to the harness.
3. Connect the battery (-) cable to the A/C compressor body.
4. Wrap the drive belt, which is no longer of use, tightly around the A/C compressor pulley.
am3zzw00032006
|
5. Hold the drive belt in place with pliers.
6. Remove/installation the bolt.
Magnetic Clutch is Disassembled/Assembled with A/C Compressor Equipped to Vehicle
1. Disconnect the negative battery terminal. (See NEGATIVE BATTERY TERMINAL DISCONNECTION/CONNECTION [(E)].)
2. Remove the following parts:
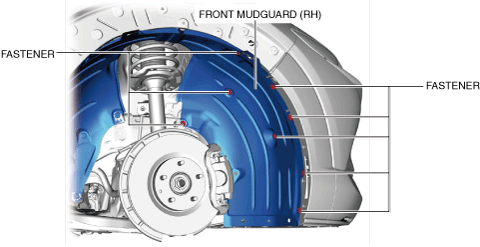
3. Remove the fasteners.
ac30zw00001825
|
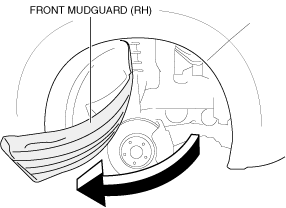
4. Bend back the front side of the front mudguard (RH) in the direction of the arrow shown in the figure.
ac30zw00001826
|
5. Disconnect the magnetic clutch connector. (See A/C COMPRESSOR REMOVAL/INSTALLATION [SKYACTIV-X 2.0].)
6. Disassemble in the order indicated in the table.
ac30zw00001827
|
|
1
|
Bolt
(See Bolt removal/installation.)
|
|
2
|
Pressure plate
|
|
3
|
Shim
|
|
4
|
Drive Belt
|
|
5
|
Snap ring
|
|
6
|
A/C compressor pulley
|
|
7
|
Snap ring
|
|
8
|
Stator
|
7. Assemble in the reverse order of disassembly.
8. Adjust the magnetic clutch clearance. (See MAGNETIC CLUTCH ADJUSTMENT [SKYACTIV-G].)
Bolt removal/installation
1. Connect the harness to the magnetic clutch connector.
ac30zw00001828
|
2. Connect the battery (+) cable to the harness.
3. Connect the battery (-) cable to the A/C compressor body.
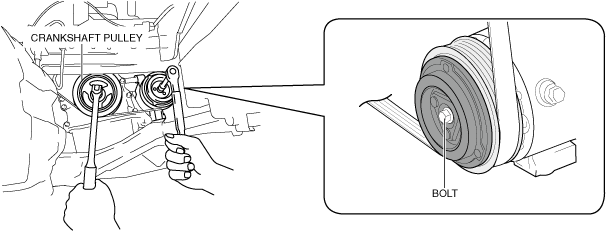
4. Secure the crankshaft pulley.
ac30zw00001829
|
5. Remove/installation the bolt.
Stator removal/installation note
1. Remove the bolt.
ac30zw00001830
|
2. Remove the clip.
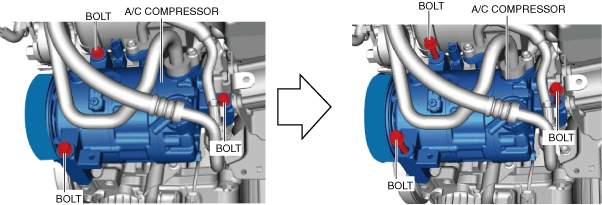
3. Set the lower radiator hose out of the way.
4. Remove the bolts.
ac30zw00001831
|
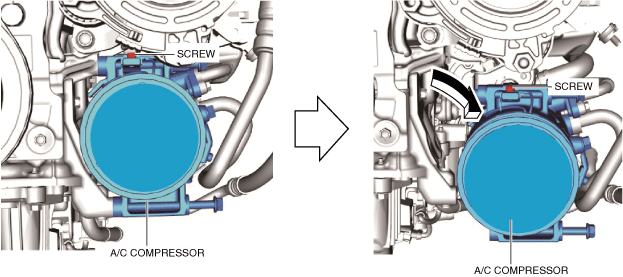
5. Move the A/C compressor in the direction of the arrow shown in the figure to secure a space for removing the screw.
ac30zw00001832
|
6. Remove the screw.