 |
ac30zw00000759
HOOD RELEASE LEVER AND RELEASE CABLE REMOVAL/INSTALLATION [(E)]
id0914000067x2
L.H.D.
1. Disconnect the negative battery terminal. (See NEGATIVE BATTERY TERMINAL DISCONNECTION/CONNECTION [(E)].)
2. Remove the following parts:
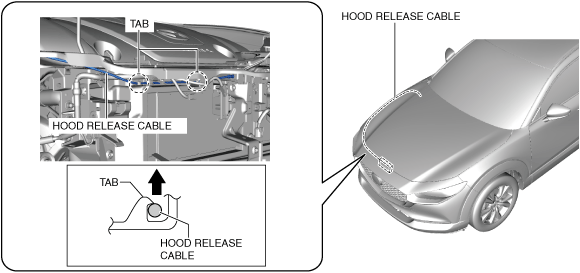
3. Disconnect the hood release cable from the hood latch.
4. Remove the hood release cable from tabs.
ac30zw00000759
|
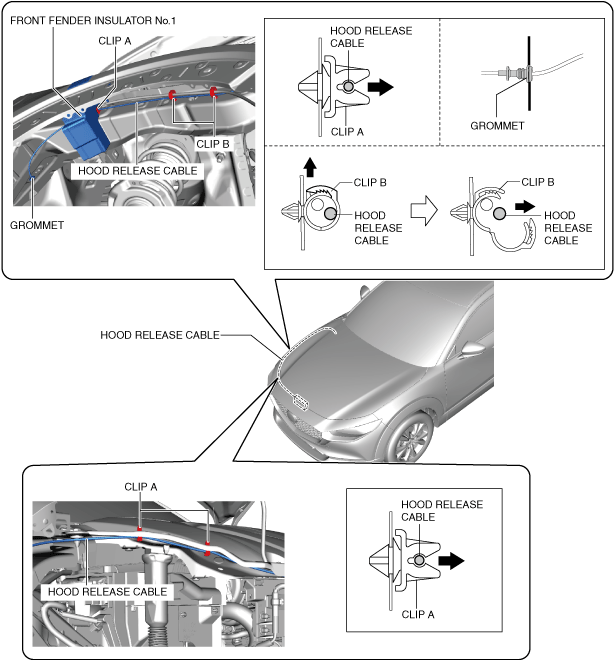
5. Remove the hood release cable from clips A. (See Hood release cable installation note.)
ac30zw00004991
|
6. Remove the grommet.
7. Pull out the hood release cable from front fender insulator No.1.
8. Remove the hood release cable.
9. Install in the reverse order of removal.
10. Perform the front radar sensor aiming adjustment. (with front radar sensor) (See FRONT RADAR SENSOR AIMING.)
11. Perform the front side radar sensor aiming adjustment. (with front side radar sensor) (See FRONT SIDE/REAR SIDE RADAR SENSOR AIMING.)
12. Perform the 360° monitor system aiming. (with 360° view monitor system) (See 360°VIEW MONITOR SYSTEM AIMING.)
R.H.D.
1. Disconnect the negative battery terminal. (See NEGATIVE BATTERY TERMINAL DISCONNECTION/CONNECTION [(E)].)
2. Remove the following parts:
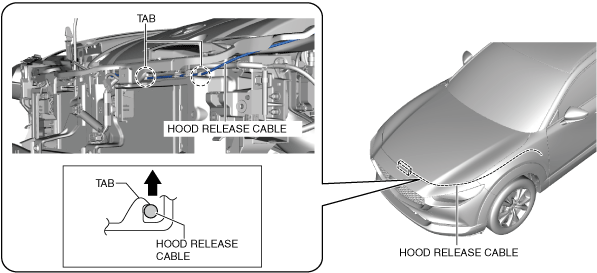
3. Disconnect the hood release cable from the hood latch.
4. Remove the hood release cable from tabs.
ac30zw00000761
|
5. Remove the hood release cable from clips A and B. (See Hood release cable installation note.)
ac30zw00000762
|
6. Remove the grommet.
7. Pull out the hood release cable from front fender insulator No.1.
8. Remove the hood release cable.
9. Install in the reverse order of removal.
10. Perform the front radar sensor aiming adjustment. (with front radar sensor) (See FRONT RADAR SENSOR AIMING.)
11. Perform the front side radar sensor aiming adjustment. (with front side radar sensor) (See FRONT SIDE/REAR SIDE RADAR SENSOR AIMING.)
12. Perform the 360° monitor system aiming. (with 360° view monitor system) (See 360°VIEW MONITOR SYSTEM AIMING.)
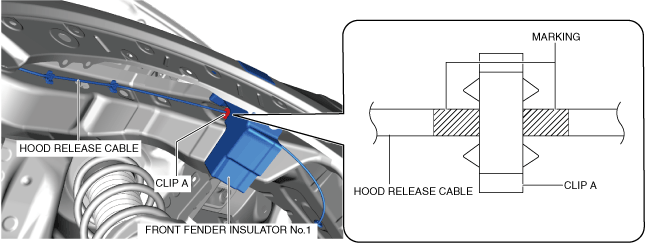
Hood release cable installation note
L.H.D.
ac30zw00000763
|
R.H.D.
ac30zw00000764
|