 |
am3zzw00036855
WATER PUMP REMOVAL/INSTALLATION [SKYACTIV-X 2.0]
id0112hf800700
Replacement part
|
Gasket
Quantity: 1
Location of use: Water pump component
|
Oil and chemical type
|
Engine coolant
Type: Recommended engine coolant
|
1. Disconnect the negative battery terminal. (See NEGATIVE BATTERY TERMINAL DISCONNECTION/CONNECTION [(E)].)
2. Remove front under cover No.2. (See FRONT UNDER COVER No.2 REMOVAL/INSTALLATION.)
3. Remove the front splash shield (RH). (See SPLASH SHIELD REMOVAL/INSTALLATION)
4. Remove the following parts. (See SIDE WALL REMOVAL/INSTALLATION [SKYACTIV-X 2.0])
5. Remove the coolant reserve tank. (See COOLANT RESERVE TANK REMOVAL/INSTALLATION [SKYACTIV-X 2.0])
6. Remove the No.3 engine mount. (See ENGINE MOUNT DISASSEMBLY/ASSEMBLY [SKYACTIV-X 2.0])
7. Remove the drive belt. (See DRIVE BELT REMOVAL/INSTALLATION [SKYACTIV-X 2.0].)
8. Open the engine cover. (See ENGINE COVER OPEN/CLOSE [SKYACTIV-X 2.0].)
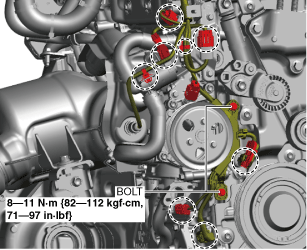
9. Remove the couplers, clips, and the installation bolts shown in the figure, and then move the wiring harness towards the rear of the vehicle.
am3zzw00036855
|
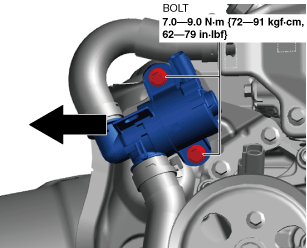
10. Remove the coolant switching valve installation bolts shown in the figure and move the coolant switching valve towards the rear of the vehicle.
am3zzw00036856
|
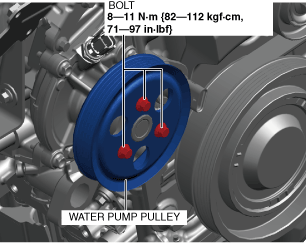
11. Remove the water pump pulley.
am3zzw00036857
|
12. Drain the engine coolant. (See ENGINE COOLANT REPLACEMENT [SKYACTIV-X 2.0].)
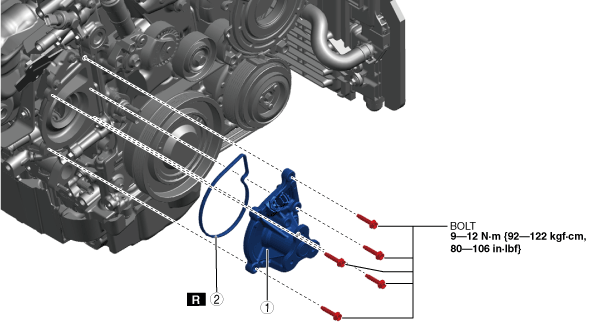
13. Remove using the procedure shown in the figure.
14. Install in the reverse order of removal.
15. Add engine coolant. (See ENGINE COOLANT REPLACEMENT [SKYACTIV-X 2.0].)
16. Inspect for engine coolant leakage. (See ENGINE COOLANT LEAKAGE INSPECTION [SKYACTIV-X 2.0].)
ac30zw00005226
|
|
1
|
Water pump component
|
|
2
|
Gasket
|
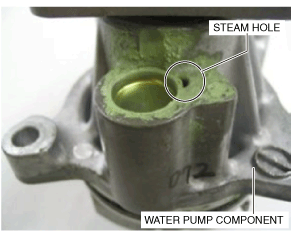
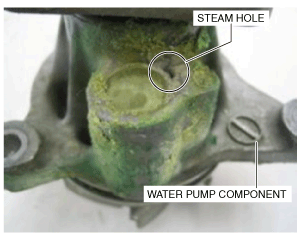
Determination Criteria for Water Pump Coolant Leakage
ac3ccw00000026
|
ac3ccw00000027
|