 |
am3zzw00023037
FRONT STABILIZER REMOVAL [(E)]
id0213008034x2
1. Disconnect the negative battery terminal and wait for 1 min or more. (With Mazda M Hybrid) (See NEGATIVE BATTERY TERMINAL DISCONNECTION/CONNECTION [(E)].)
2. Remove the wheel and tire. (See WHEEL AND TIRE REMOVAL/INSTALLATION.)
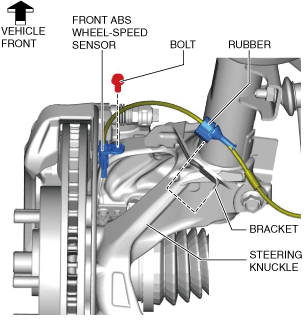
3. Disconnect the rubber from the bracket.
am3zzw00023037
|
4. Disconnect the front ABS wheel-speed sensor wiring harness on the steering knuckle and set it aside so that it does not interfere with the servicing.
5. Remove the tunnel cover. (See EXHAUST SYSTEM REMOVAL/INSTALLATION [SKYACTIV-G (WITH CYLINDER DEACTIVATION (E))].) (See EXHAUST SYSTEM REMOVAL/INSTALLATION [SKYACTIV-D 1.8].) (See MIDDLE PIPE REMOVAL/INSTALLATION [SKYACTIV-X 2.0].)
6. Remove the following parts.
7. Disconnect the tie-rod end from the steering knuckle. (See TIE-ROD END REPLACEMENT [(E)].)
8. Remove the front stabilizer control link. (See Front Stabilizer Control Link Removal Note.)
am3zzw00023038
|
9. Disconnect the front lower arm ball joint from the steering knuckle. (See FRONT LOWER ARM REMOVAL/INSTALLATION [(E)].)
10. Remove the following parts. (With Mazda M Hybrid)
11. Remove the front deflector. (See DEFLECTOR REMOVAL/INSTALLATION.)
12. Remove the front splash shield. (See SPLASH SHIELD REMOVAL/INSTALLATION.)
13. Remove the joint cover. (See STEERING WHEEL AND COLUMN REMOVAL/INSTALLATION [(E)].)
14. Disconnect the intermediate shaft from the steering gear and linkage. (See STEERING WHEEL AND COLUMN REMOVAL/INSTALLATION [(E)].)
15. Disconnect the ground plate. (With Mazda M Hybrid) (See GROUND PLATE DISCONNECTION/CONNECTION.)
16. Remove the front crossmember component. (See FRONT CROSSMEMBER REMOVAL/INSTALLATION [(E)].)
17. Remove the hole cover No.1 and hole cover No.2. (See FRONT CROSSMEMBER REMOVAL/INSTALLATION [(E)].)
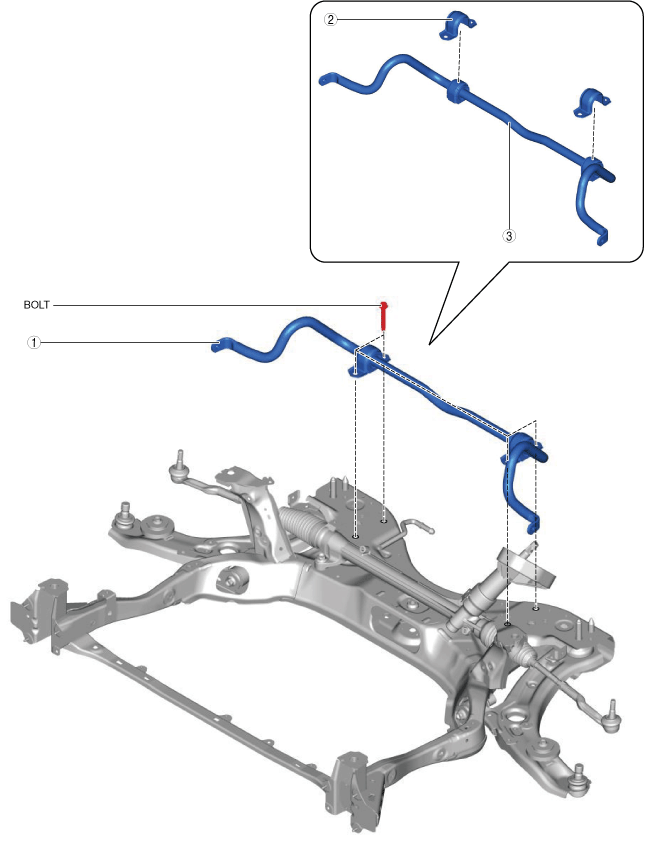
18. Remove in the order shown in the figure.
am3zzw00023040
|
|
1
|
Front stabilizer component
|
|
2
|
Front stabilizer bracket
|
|
3
|
Front stabilizer
|
Front Stabilizer Control Link Removal Note
1. Insert a hexagon wrench into the ball joint stud.
2. Remove the nuts so that the ball joint does not rotate.
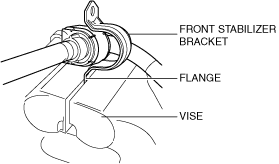
Front Stabilizer Bracket Removal Note
1. If the front stabilizer bracket cannot be removed by hand, remove it using a vise.
ac8wzw00001926
|